Earlier this year we wrote about how to automagically tag and release serverless functions and how to automate your sales channels with serverless functions. Since then we iterated over our automation and release processes and managed to add node8 support into the serverless framework as well. But that’s not enough. The serverless framework is great with Amazon Lambda, but even though Google Cloud Functions are supported, functionality is very basic. The challenge we faced was deployment on two different projects.
On Google Cloud, the best way to deal with a staging and production environment is to create two different projects. We created a staging project in Europe (closer to the development team) and have production set up in the US (closer to customers) — win win, everyone gets the best user experience.
With serverless on AWS this is very simple to do. With serverless on Google Cloud, impossible. Since only one config file is supported. We’ve tried a few approaches but in the end decided to ditch serverless and work with Google Cloud features directly. Initially we thought this would mean a lot of work to migrate everything, but it was a lot easier than expected.
Requirements & Setup
To set up fully automated, semantic deployment on several projects with Google Cloud, you need three things:
- Separate Google Cloud projects (ie
project-devandproject-app) - Travis-CI Pro
- Google Cloud Build
You can use a similar setup with
semantic-release as
mentioned earlier in our serverless 2.0 article, with a few changes. As a
pre-requisite, we expect you have semantic-release running and
Travis-CI set up and working. From your travis.yml
remove the deploy scripts. Travis now is only responsible for continuous
testing and to tag the release on GitHub (= faster build).
Source Repositories
First of all, you should mirror your (GitHub) repositories into Google Cloud. Activate the Source Repositories API in your project and head to Source Repositories. You can authenticate with GitHub and mirror the repository with the same name here. Serverless usually compresses and uploads the folders to Cloud Storage, then deploys them to the function, this step is not required when using Source Repositories, since the function can deploy straight from there.
Cloud Build & Triggers
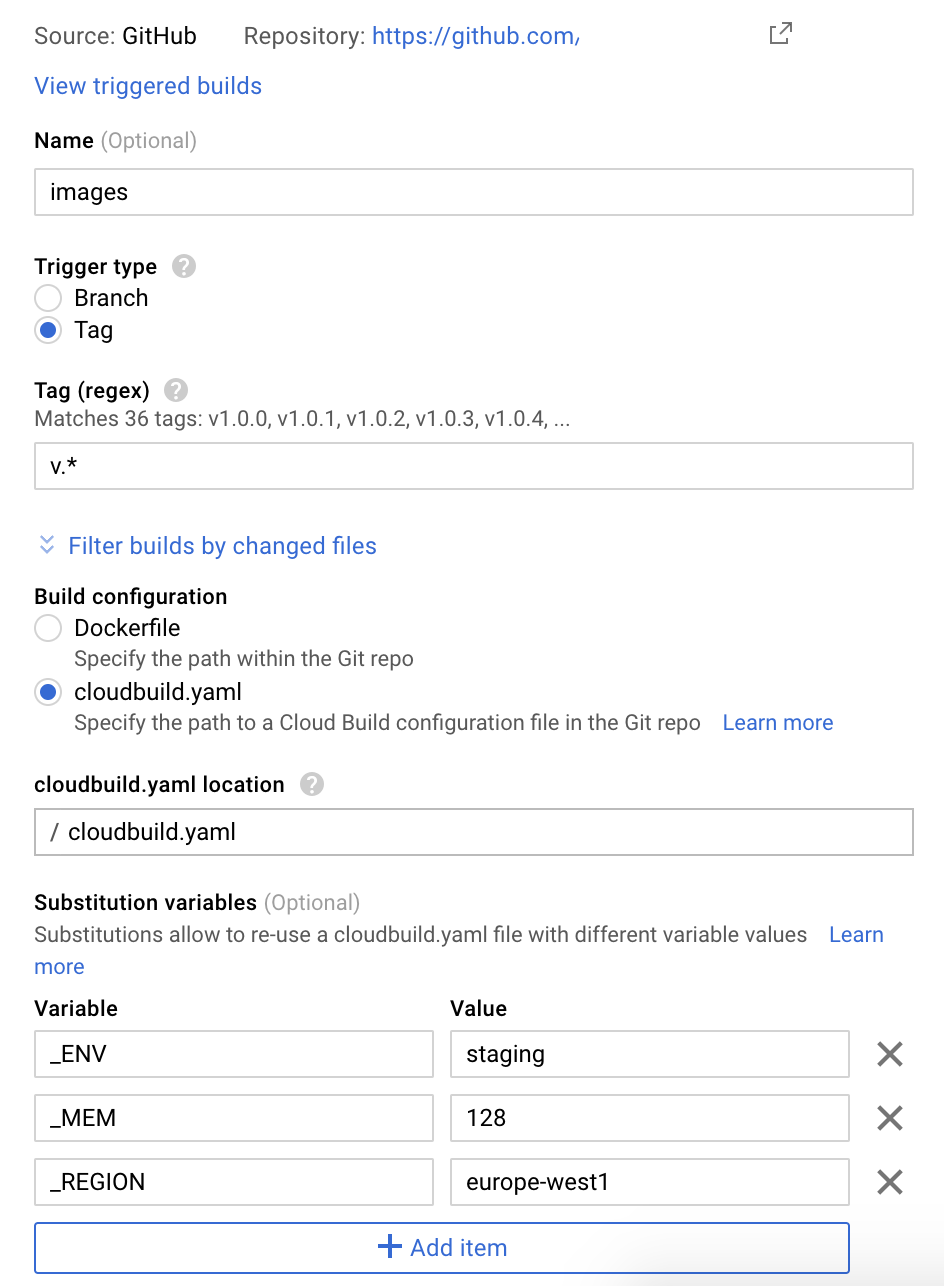
Once you have the repo mirrored, activate the Cloud Build API in the project and head to Cloud Build. You will find a second tab “Triggers” where you can configure automated build triggers. If you have semantic-release running on Travis and everything works, you should select changes on “tags” as build trigger:

Once saved, every tag/release on GitHub will trigger the build process. This will fail, since you don’t have the build steps defined yet. I’ll get to the Substitution variables in a bit.
First, if you have used the serverless framework before, remove the
.serverless folder and serverless.yml file. For different environments, we
have different environment variable files. It’s not the most elegant solution,
if you have suggestions on how to improve that, please let us know!
At the moment, we create production releases manually and tag them -live to
trigger releases on the production project. We’re looking forward to the next
semantic-release with multi-branch and multi-channel.
Key Management System (KMS)
We use Cloud Key Management System (KMS) to encrypt both staging and production
environment files. Head over to
Cryptographic Keys to add a new
Key Ring and Key. Then you can add this snippet to your Makefile to encrypt
the file safely. Here’s an example for .staging.yaml and Makefile. All
environment variables should be on your .gitignore. Don’t commit them to the
repo.
Last, you need the cloudbuild.yml file to put everything together
Cloud Build Steps
The first step is to decrypt the environment files and save them for the build. Variables are visible on Cloud Functions and in the build, here’s where access control to the project is important. Developers have access to staging, but not production.
The first step also has an id. This is a neat little trick which isn’t all
that obvious in the docs, hidden in
“Step Order”.
In the second step we use waitFor: ["decrypt"], we wait for the first step to
complete and then run everything else. All further steps also just wait for
decrypt, means we can deploy all functions in parallel, once the variables are
there. We managed to get our builds down to 2–3 minutes, from initial >15 mins,
before we found concurrent builds.
In the step to deploy the function, we use --env-vars-file to specify the
environment file. ${_MEM} and ${_REGION} help us to control the memory and
region requirements for each build, we use 128Mb and europe-west1 for staging,
256Mb and us-central1 for production, configured in the Build Trigger.
Once you have the cloudbuild.yaml added to the repo, your function should
already automatically to
Google Cloud Functions.
Summary
We group functions based on business purpose or logic. For example, we have all
image-related functions in a repo images. With 5–6 functions per build, we
averaged at 10 minutes deployment time with Travis and Serverless. If a
deployment failed for some reason, we had to run CI and CD again. Moving
continuous deployment to Cloud Build, our tests run within 2m30s,
semantic-release barely takes time to create the release on GitHub and our Cloud
Trigger picks up immediately and starts building. With parallel builds we have
an average build time of 2–3 minutes. This means we don’t save too much time
with the deployment in total, but we build & deploy directly on Google, which
means we don’t need keyfiles any longer and don’t need to worry on how we manage
multiple keyfiles for multiple environments. We’re still investigating in better
ways on how to handle the environment files, but for now we’re quite happy with
the setup.
Thanks for reading! If you have any questions or comments, please reach out on Bluesky or start a discussion on GitHub.
