TL;DR
In this article we’ll learn how to launch a JavaScript application on Google Cloud Run (fully managed) with:
- Server Side Rendering (SSR)
- TLS (managed by Google)
- Global Content Delivey Network (CDN)
- resources and services in the same network (no added network delays)
- No cold starts*
- No CORS (avoid preflight requests)
We’ll also demonstrate how to get close to dev/prod parity with a local development setup.
You can find all relevant configuration files and code example the Universal Apps on Cloud Run GitHub Repo.
The concept of universal/isomorphic apps is that the first page is rendered on
the server and delivered to the client in plain HTML and CSS, while additional
JavaScript is delivered after, to allow the “application like” usability known
from Single Page Applications. By caching the rendered pages on the CDN, we aim
for fast initial page load with low First Input Delay/Largest Contentful Paint
(Web Vitals). By avoiding CORS preflight requests, we
skip the additional OPTIONS request to the API which usually adds additional
delay to each ajax request.
This article requires basic knowledge of N*xt.js and Node.js as we’ll be building on top of that.
(*) The min-instances setting is currently in Alpha and should be available
in Beta soon, which allows to keep a certain number of instances running.
Introduction
Single Page Applications (SPA) are easy for developers and great for many things, but when it comes to web performance and search/SEO scores, Server Side Rendered (SSR) applications still perform much better.
For a recent project, we looked into Cloud Run as an easy-to-use, scalable
infrastructure. We chose Nuxt.js and
Vue.js for simplicty over Next.js and
React.js. Data is delivered by a
Node.js API. Next.js with SSR requires a build step and a
web server, while the API also requires a separate environment. In this article
we call them web and api services.
To achieve a fully automated deployment pipeline we use Google Cloud Build and Semantic Release to version and build Docker images based on our code on GitHub.
Google Cloud Run is an easy and reliable infrastructure for running Docker containers and they recently added Load Balancer and CDN support for the managed service, which means there is zero devops overhead on Kubernetes (k8s); everything is managed by Google. For advanced configurations they still offer Cloud Run for Anthos to screw and tweak with a custom Kubernetes config, but we wanted to focus on product development rather than infrastructure, and Cloud Run (managed) makes that possible.
Universal Web App with N*xt
Nuxt.js
Set up your N*xt App as usual with a generator or boilerplate. For this article we used create-nuxt-app with Universal mode and axios(a Promise based HTTP client) support:
npx create-nuxt-app web
yarn create nuxt-app web
In our example we want to retrieve a travel itinerary from our API by using an
axios request like $axios.get('/travels') and add images or other assets with
/assets/yourimage.png. We’ll add the prefix /api later in our config.
Usually you would need to set up a
proxy in axios to rewrite /api/
and /assets to the correct URLs, but this will be handled by Google Cloud’s
Load Balancer, so there is no need. Instead, we set the
environment variables
API_URL and API_URL_BROWSER in our local Docker Compose setup to overwrite
the axios configuration. These are set in next.config.js to avoid issues with
the live version on Google Cloud.
For the local setup to work, BASE_URL and API_URL_BROWSER are set to the
nginx proxy, while API_URL is used for the internal SSR requests from Nuxt
directly to the API service. On GCP (Google Cloud Platform) these adjustments
are not needed.
At this point, the web app isn’t working, because the api and assets are not
reachable by Next when running npm start, so we’ll move on to the other pieces
and get back to this later.
Node.js API with Fastify
Fastify is an amazing Node.js framework for API development. It works very similar to Express. It’s built for speed and has some great convenience functions built in, such as automatic OpenAPI/Swagger docs generation, input and output schemas and validation and a great plugin system. Here’s a basic Node.js server set up with fastify:
const { env } = require('./config')
const Fastify = require('fastify')
const AutoLoad = require('fastify-autoload')
const { join } = require('path')

const app = Fastify({
  disableRequestLogging: true
})

app.register(AutoLoad, {
  dir: join(__dirname, 'routes')
})

if (env === 'development') {
  app.register(require('fastify-http-proxy'), {
    upstream: 'http://localhost:3000',
    prefix: '/api',
    http2: false
  })
}

module.exports = app
In this demo, we are using /routes/travels/list.js to automatically generate
an endpoint GET /travels and deliver some travel data. These are locations
we’ll be travelling to in the coming months of 2020, so if you’re nearby,
give us a shout.
Two things which are important here:
disableRequestLogging- Google Cloud Run does that already, so there’s no need to log requests in Fastifyfastify-http-proxy- this is a little tricky. In our Docker Compose environment, all internal requests (requests posted by next directly to the API for server-side rendering) still have/api/in their path, so we need to proxy/api/travelsto/travelswith this little hack. For external requests, our nginx server and Google Load Balancer rewrite the path.
This should be straightforward. Once your API delivers data on
localhost:3000/travels, let’s move to deployment.
Google Cloud
Before we start with the deployment, you need to set up gcloud and create a
project on Google Cloud:
- Install
gcloudCLI https://cloud.google.com/sdk/gcloud - Create a new project on https://console.cloud.google.com/
- Set the default project:
gcloud config set project universal-apps-cloud-run-demo
You’ll need the following services activated:
- Cloud Build API (https://console.cloud.google.com/marketplace/product/google/cloudbuild.googleapis.com)
- Cloud Run API (https://console.cloud.google.com/run/create)
- Network Services / Load Balancing (https://console.cloud.google.com/net-services/loadbalancing/loadBalancers/list)
- Container Registry (https://console.cloud.google.com/gcr/images/articles/)
Deployment Pipeline
We’d recommend to use one repository for the api and one for the web service,
but for this demo we put both services in one. Once you have the repos set up
and pushed the code, go to the GitHub Marketplace and install the
Google Cloud Build App. Add
the repositories to the integration and connect the GCP projects. When you
separate into two projects, don’t forget to change the cloudbuild.yaml in both
projects to build from root, instead of a folder (- web/. and - api/. to
.)
In this article, we skip the Semantic Release setup, you can read and adjust this from a previous article Serverless 2.0.0.
We create two triggers for deployment: one for web and one for api.
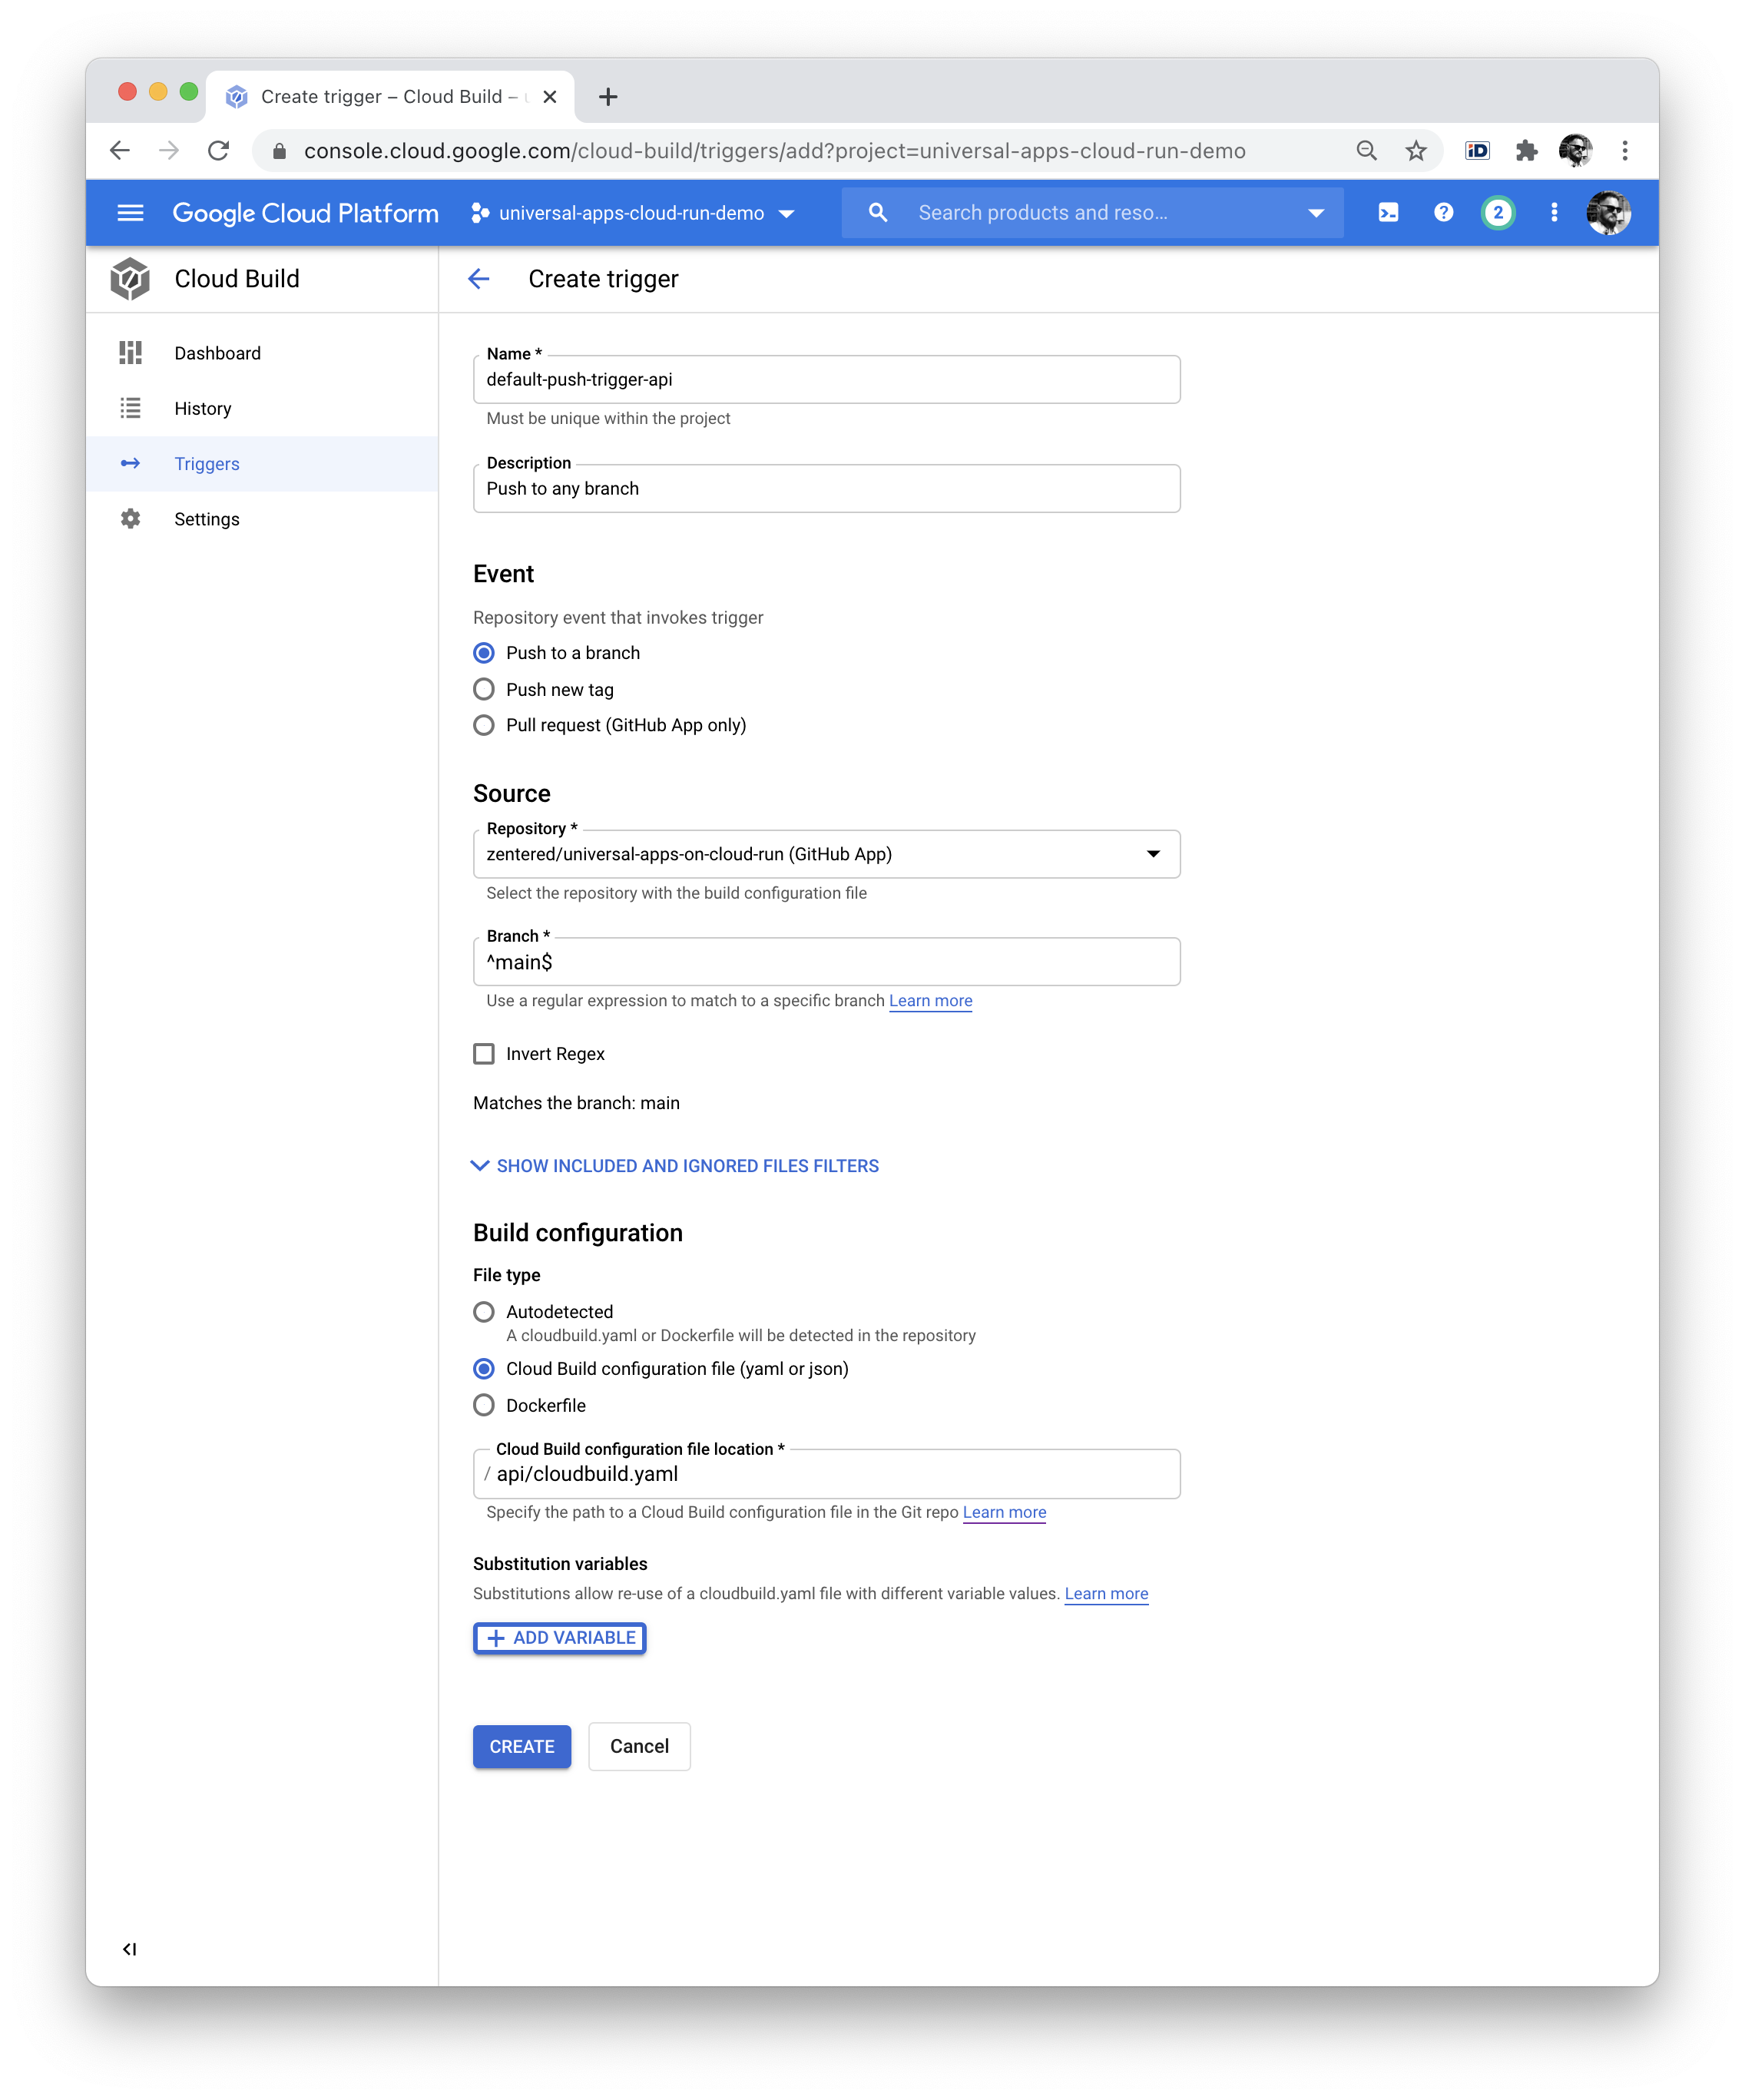
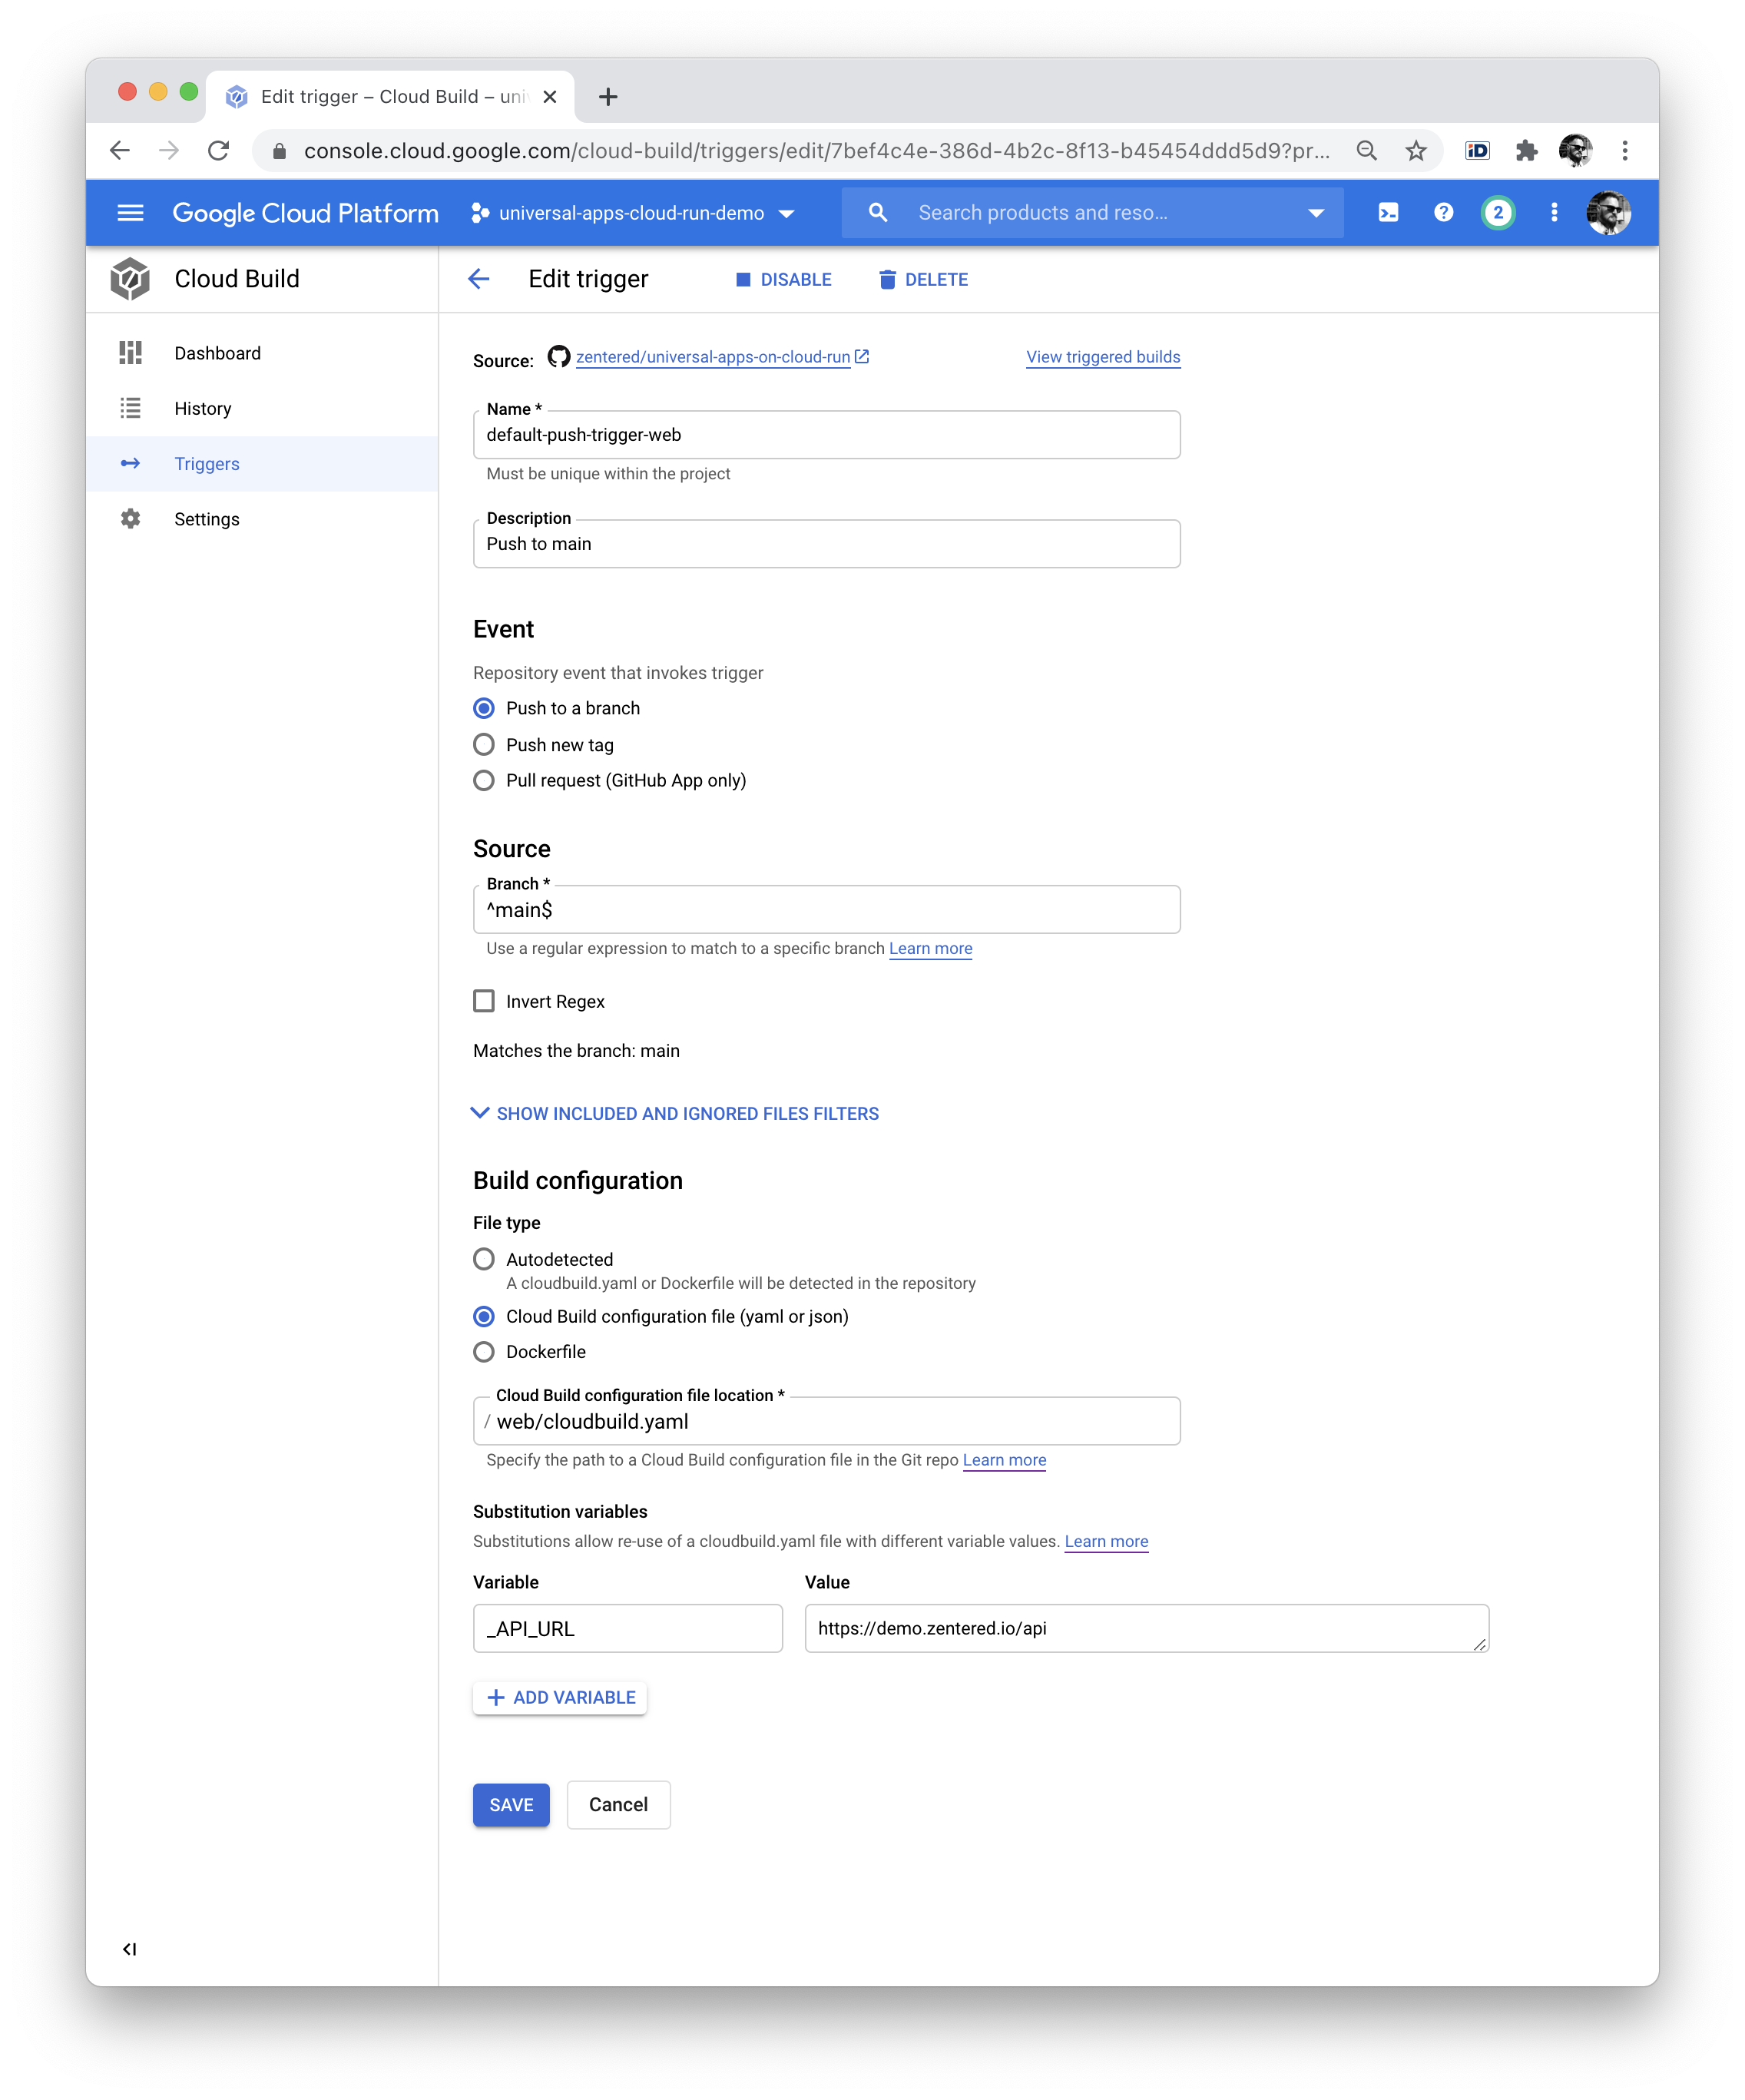
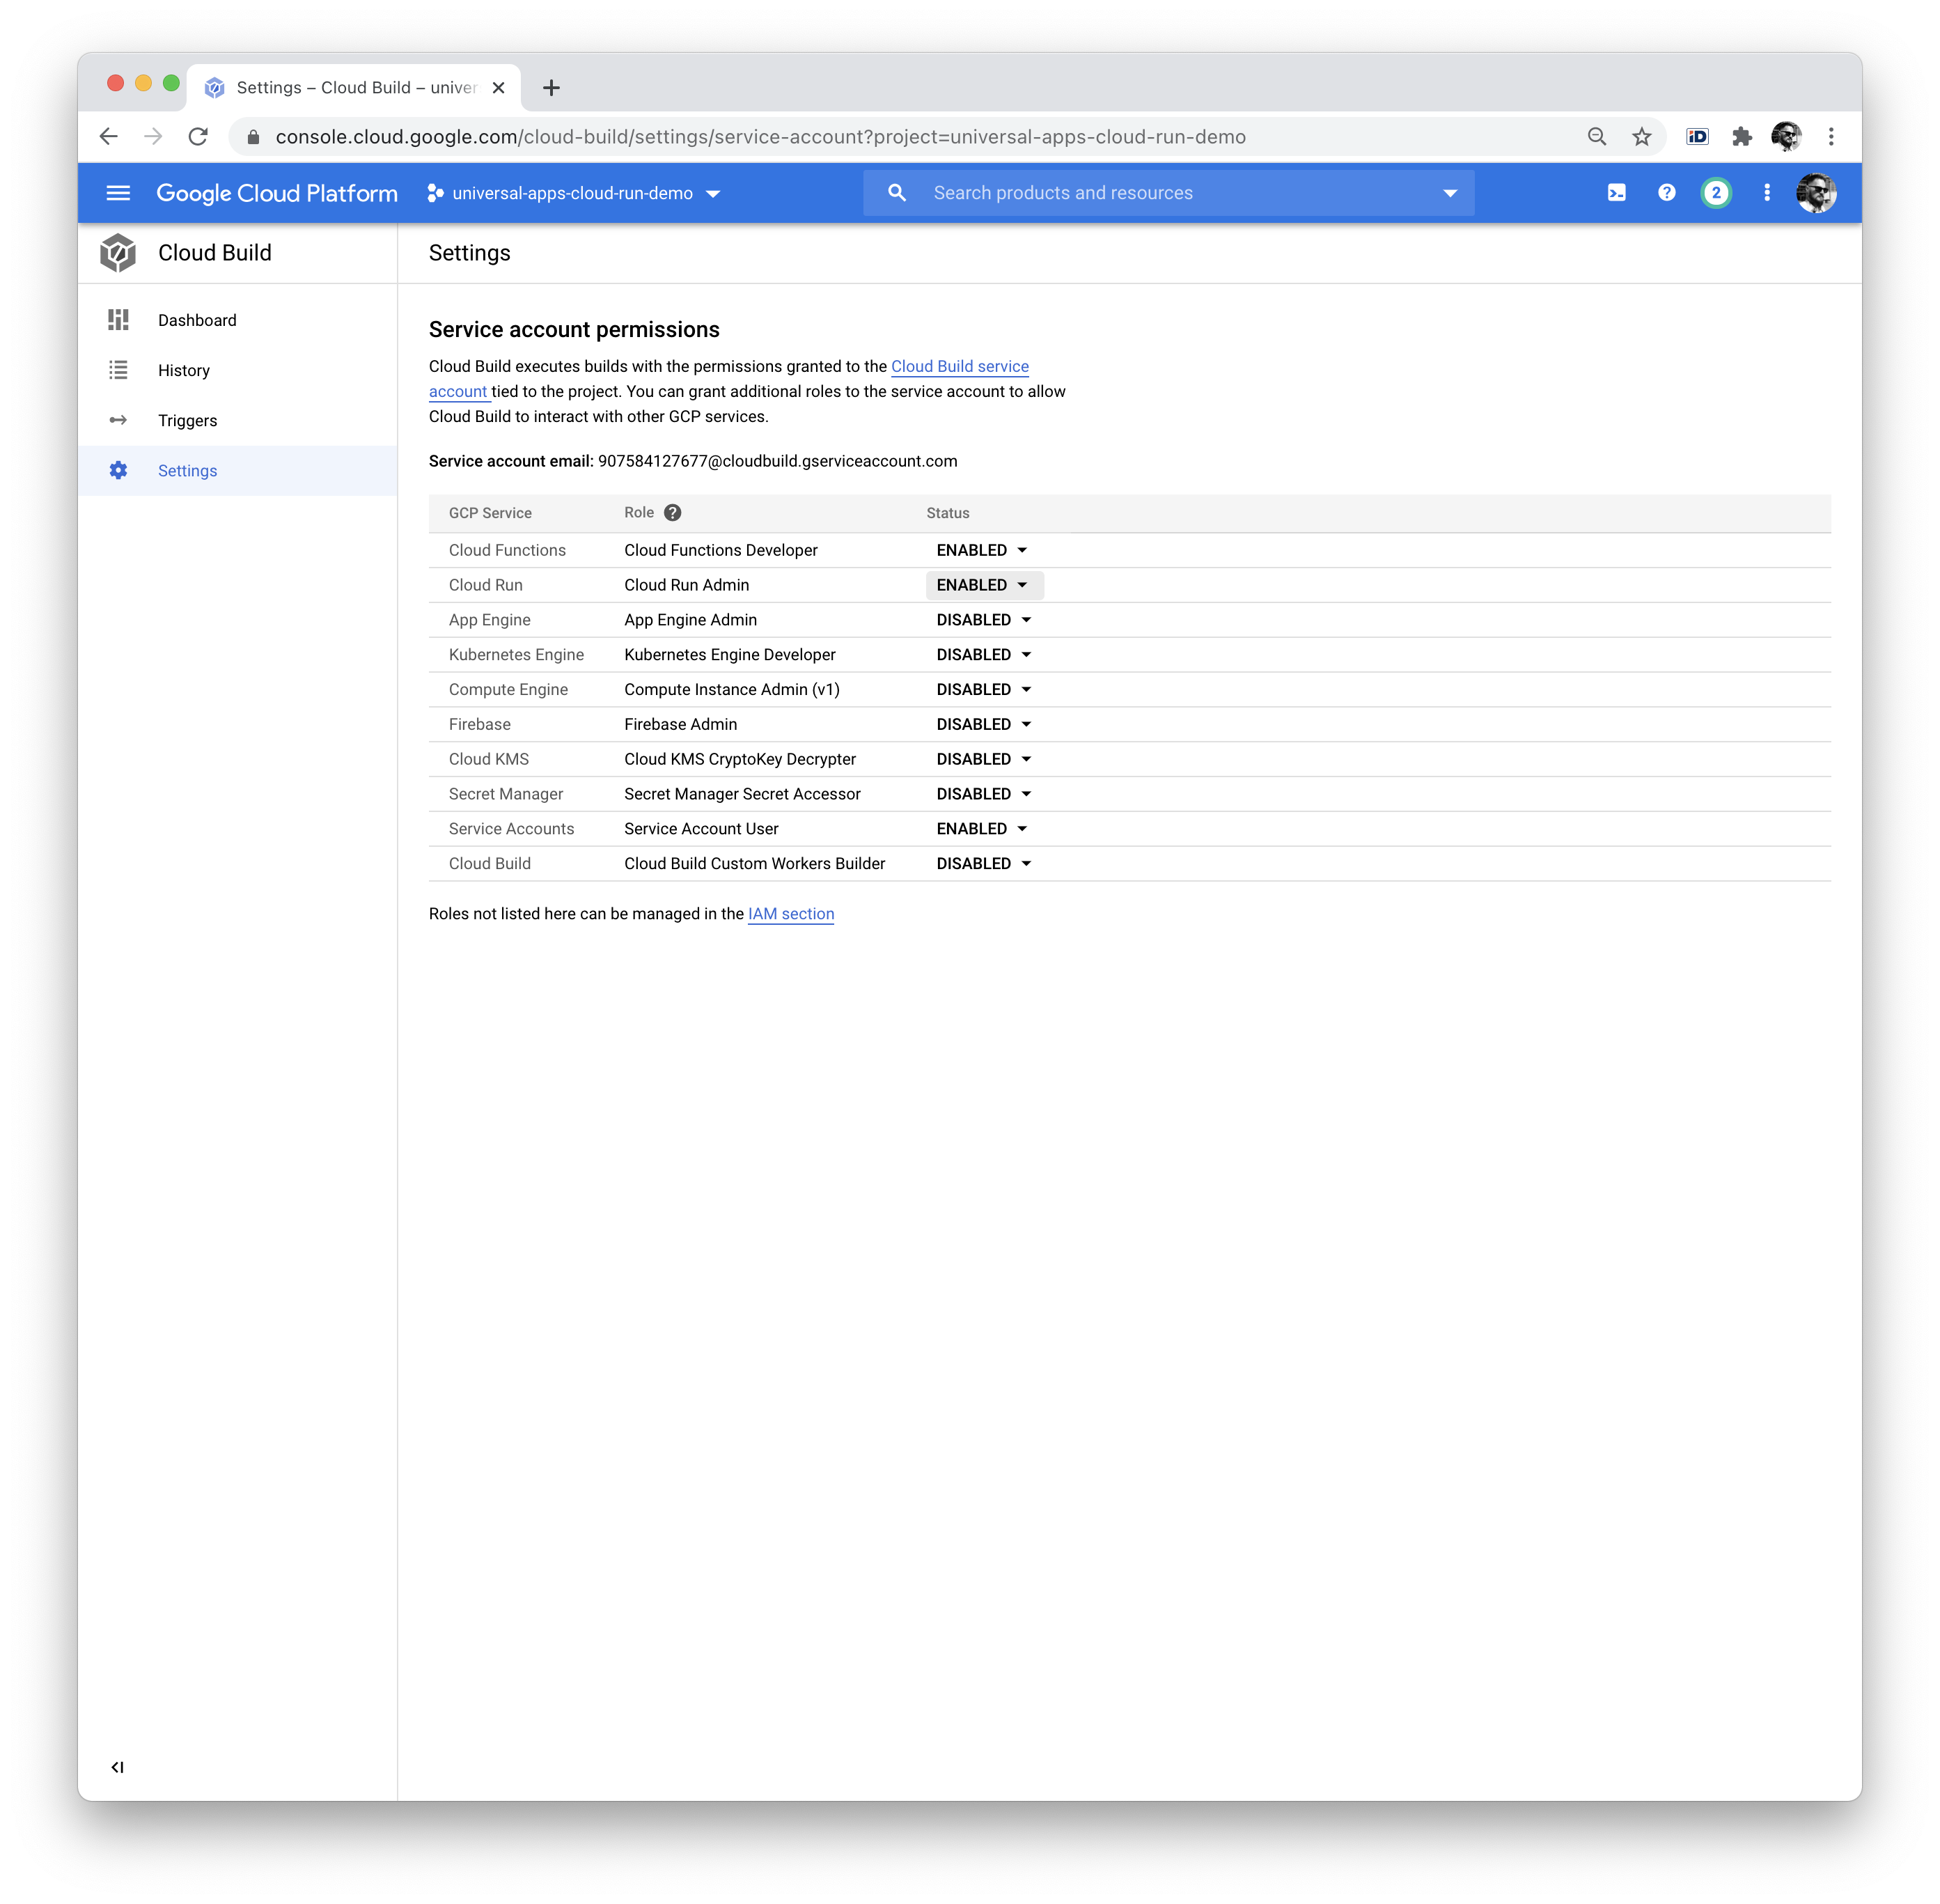
You also need to give permissions to Cloud Build to deploy on Cloud Run:
Web requires a substitition variable _API_URL set to the domain you want to
run the service on. We’re using https://demo.zentered.io/api here. A
substition variable is an environment variable that you set during build time.
You can deploy the same code with various API_URLs to test new releases for
example.
It’s important to note that the build on Cloud Build happens with
NODE_ENV=production, this means your devDependencies are not installed. Make
sure you have all build-dependencies in the dependencies of your package.json.
Once this is done, you can push to your main branch and watch Cloud Build deploy your services to Cloud Run:
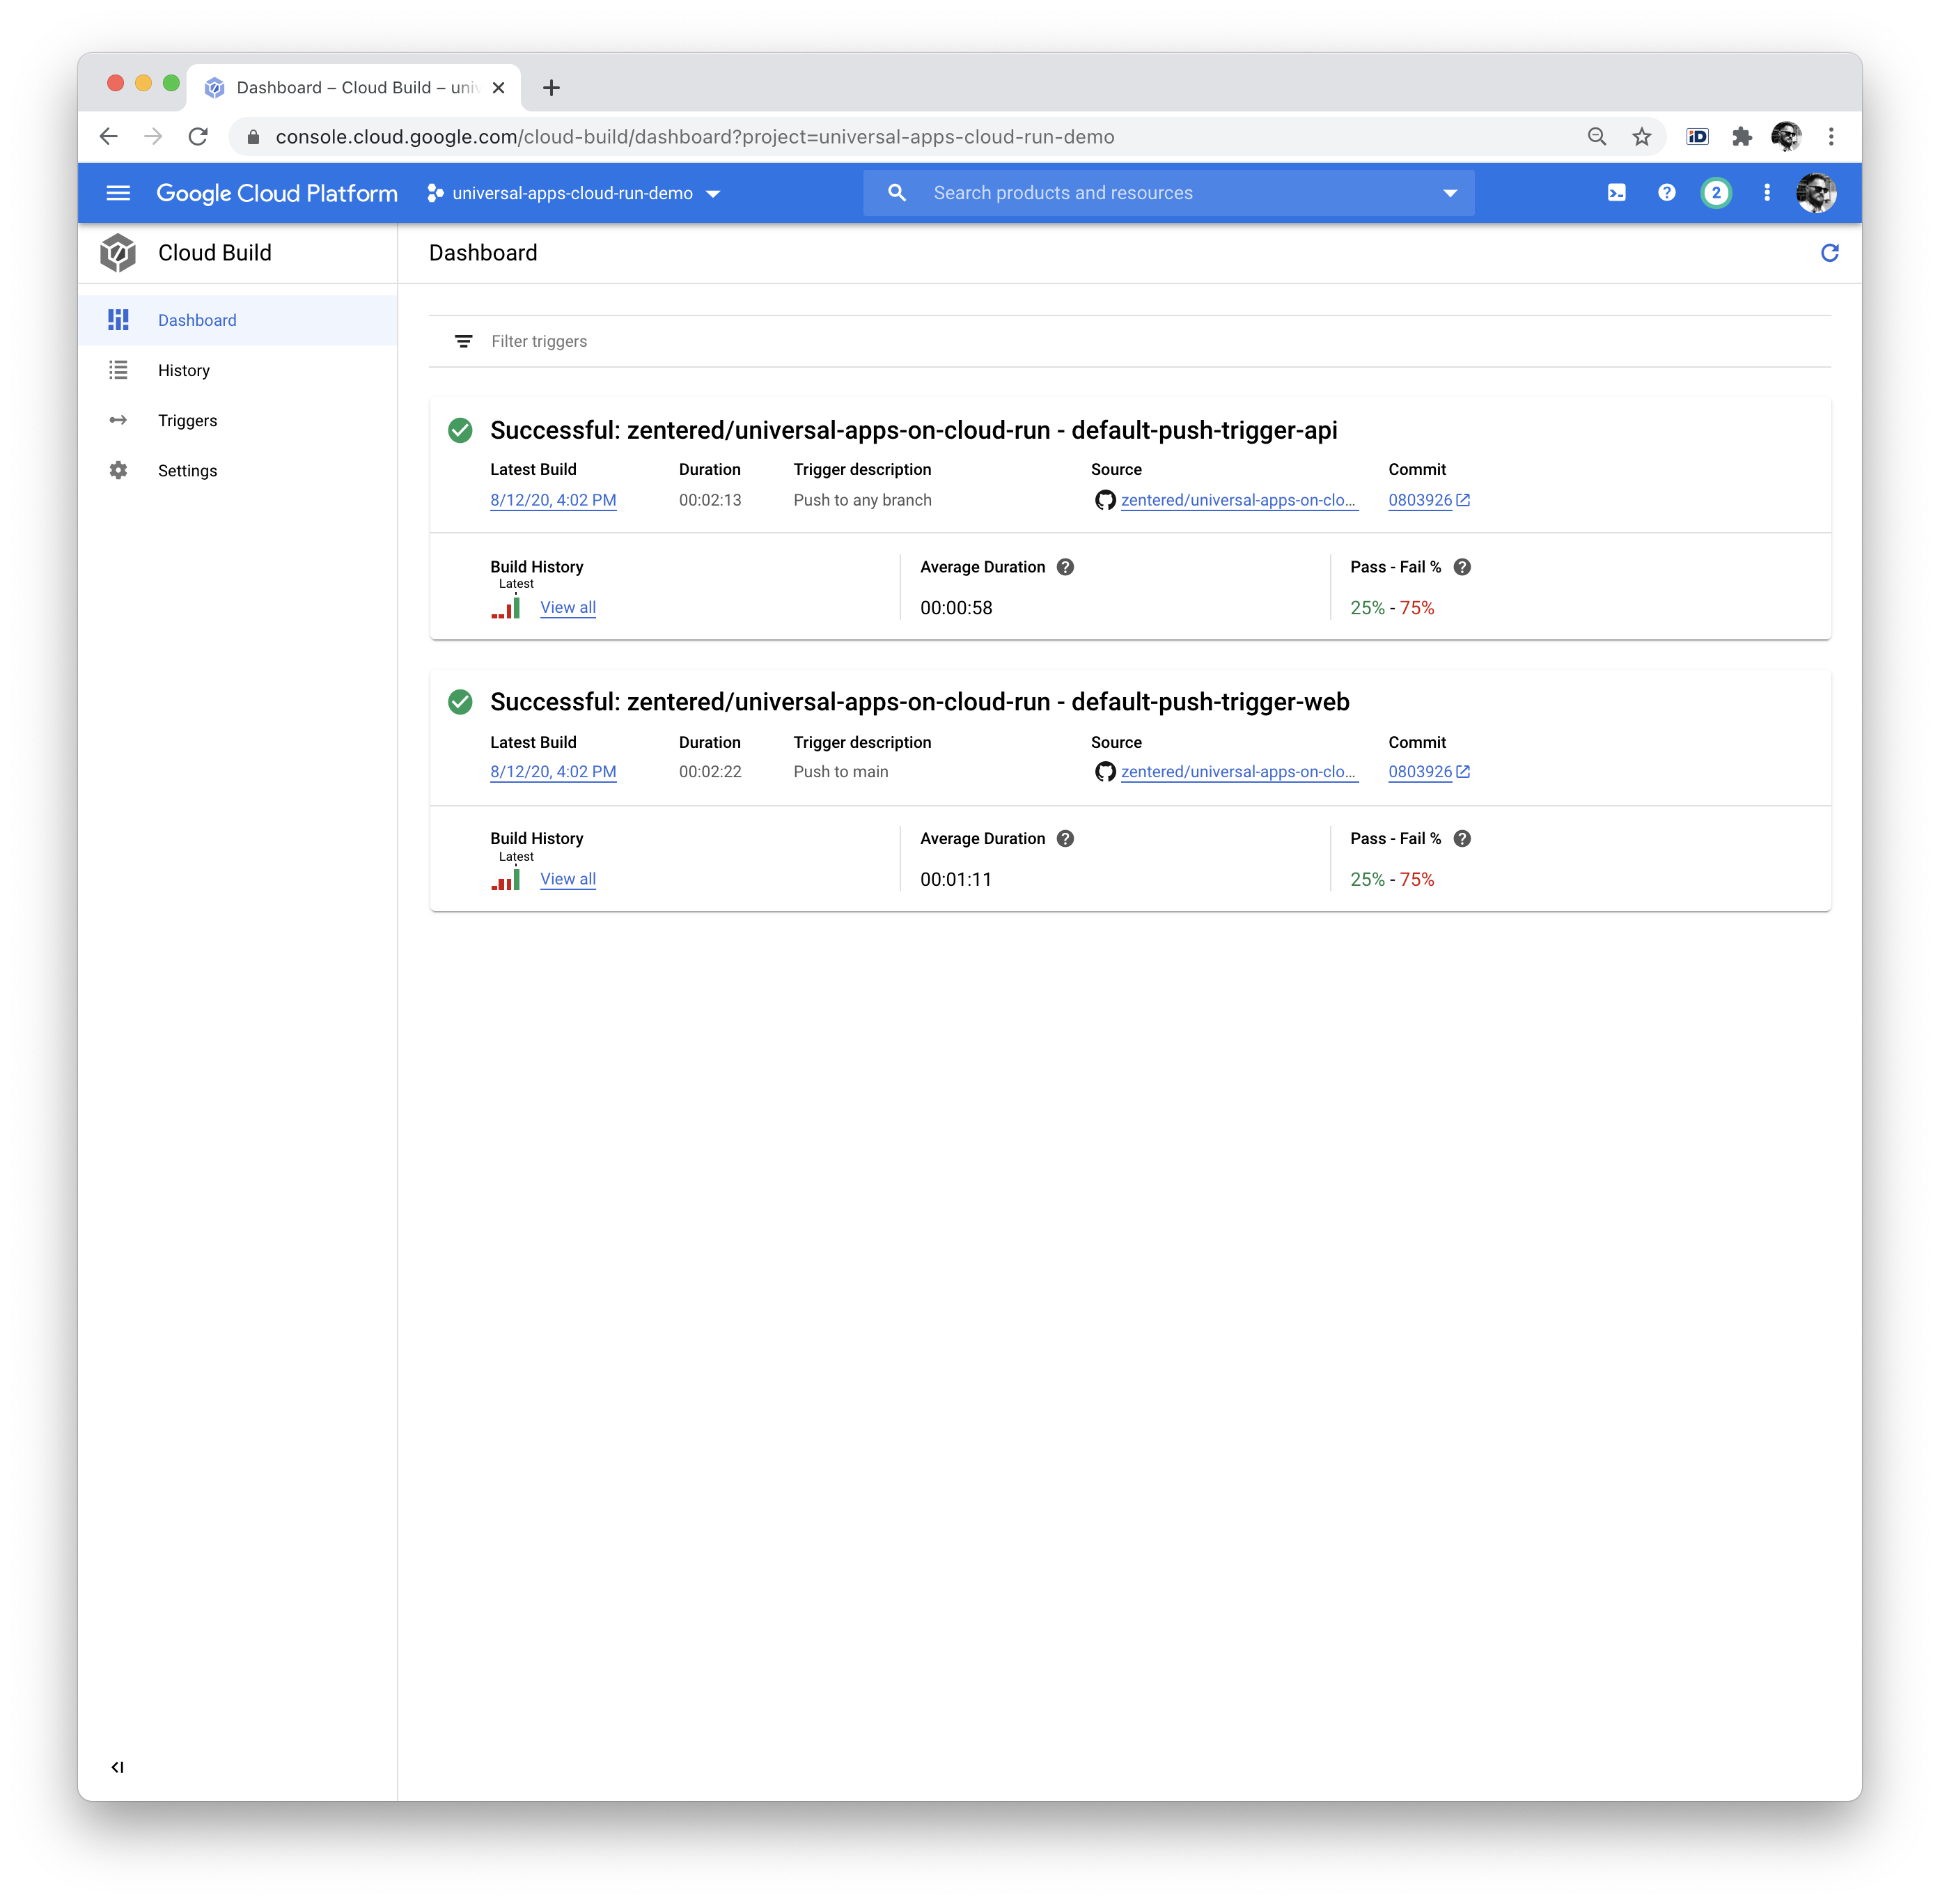
If you work with Semantic Release, a GitHub Action can create new Tags/Releases for you. Modify the trigger to build releases only.
Services on Google Cloud Run
Google Cloud Run (GCR) is a fully managed compute platform for deploying and scaling containerized applications quickly and securely. You can focus on your application, wrap them in a Docker container and let GCR do the rest.
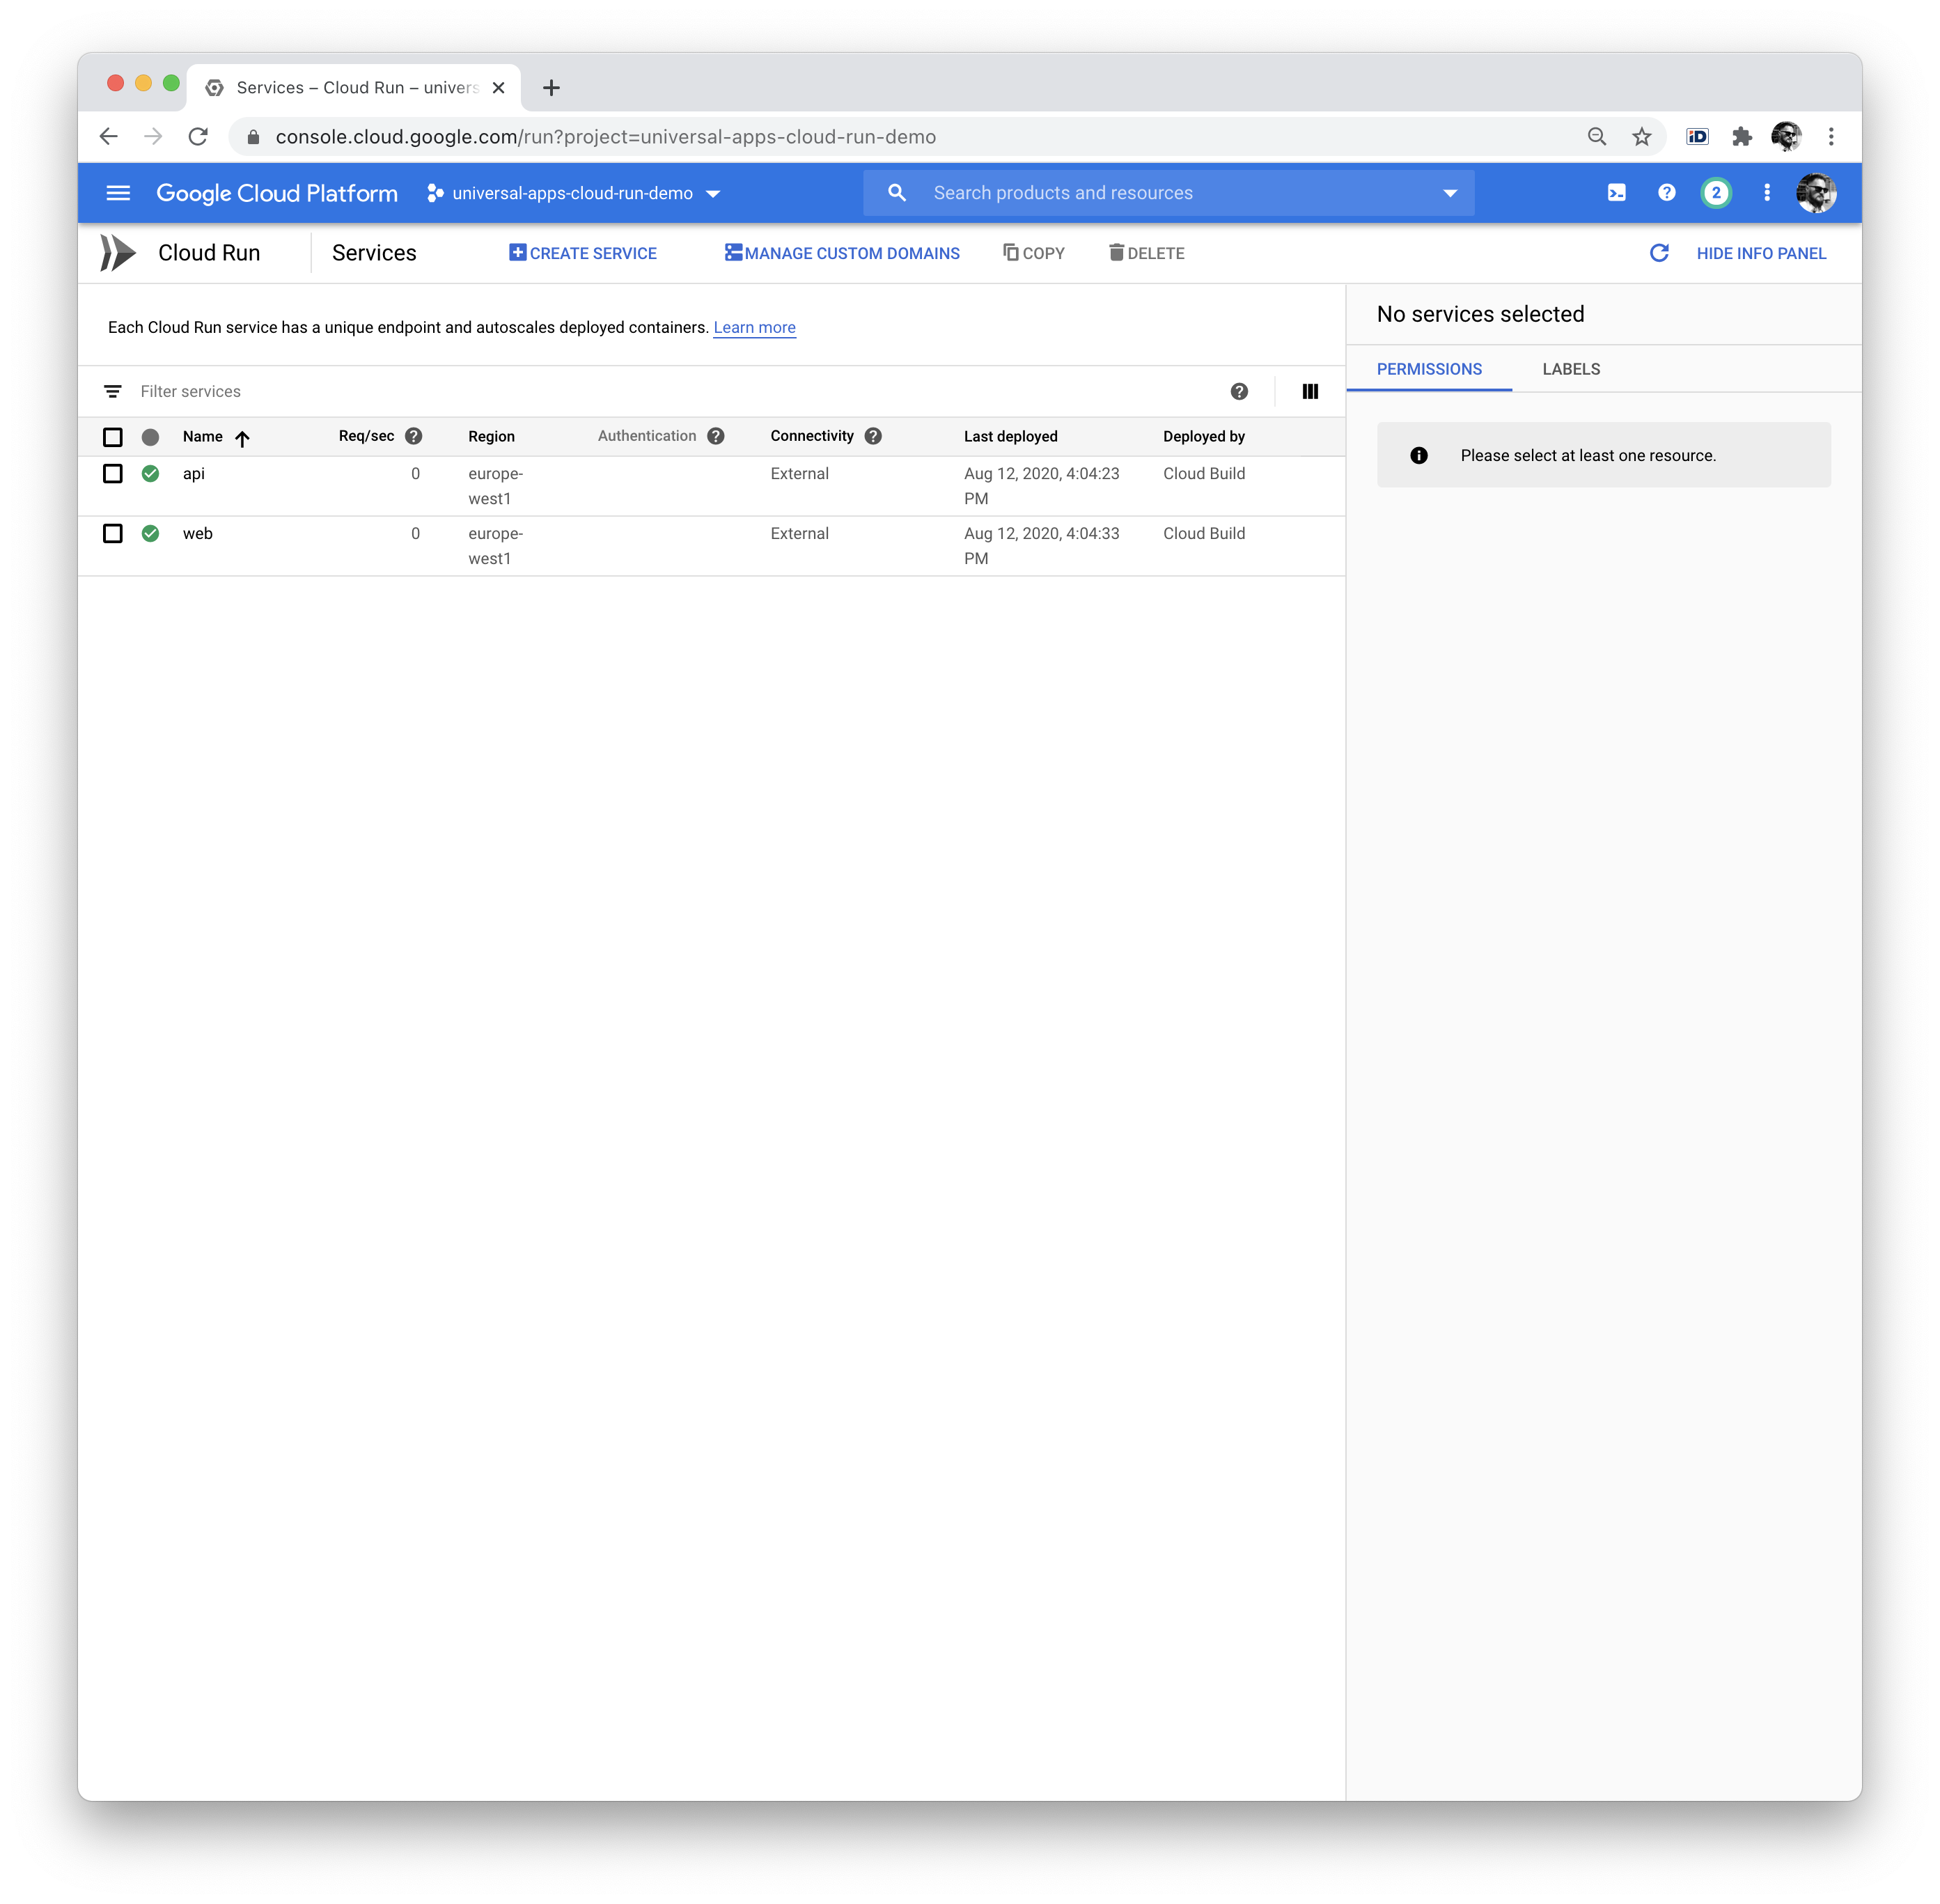
In the service details you’ll get a URL for both services which ends with .run.app. You should be able to access both services, but Nuxt will not be able to retrieve data from assets or the API yet.
Assets Bucket
To store images and other assets for your site, head over to Google Cloud Storage, create a public bucket and upload some files. At a later stage you might want to have a build step to copy assets from your web service to Cloud Storage.
Load Balancer with SSL and CDN
Quick recap. We have a deployment pipeline to deploy two services, web and
api, automatically to Cloud Run. Pusing to the repo triggers a deployment. Both
services are public and have their internal *.run.app URLs. We also have a
public bucket for assets etc.
Now we’re placing the last piece of the puzzle to make everything work together: the Load Balancer for Serverless Network Endpoint Groups (NEGs).
You will need a domain and an A record to an external IP address from Google Cloud that you can create as follows:
gcloud compute addresses create web \
--ip-version=IPV4 \
--global
Get the IP with:
gcloud compute addresses describe web \
--format="get(address)" \
--global
Feel free to replace europe-west1 with any of the following regions that is
closer to you:
- asia-east1 (Taiwan)
- asia-northeast1 (Tokyo)
- asia-northeast2 (Osaka)
- europe-north1 (Finland)
- europe-west1 (Belgium)
- europe-west4 (Netherlands)
- us-central1 (Iowa)
- us-east1 (South Carolina)
- us-east4 (Northern Virginia)
- us-west1 (Oregon)
See Cloud Run locations for a full list and pricing.
If you need more information about the individual parts, you can head over to the Google Tutorial. Here’s a summary of the commands that need to be executed in order:
Network Endpoint Group (NEG)
gcloud beta compute network-endpoint-groups create web-neg --region=europe-west1 --network-endpoint-type=SERVERLESS --cloud-run-service=web
gcloud beta compute network-endpoint-groups create api-neg --region=europe-west1 --network-endpoint-type=SERVERLESS --cloud-run-service=api
Backend Services
gcloud beta compute backend-buckets create assets --gcs-bucket-name=uwa-demo-bucket --enable-cdn
gcloud beta compute backend-services create web-service --global
gcloud beta compute backend-services add-backend web-service --global --network-endpoint-group=web-neg --network-endpoint-group-region=europe-west1
gcloud beta compute backend-services create api-service --global
gcloud beta compute backend-services add-backend api-service --global --network-endpoint-group=api-neg --network-endpoint-group-region=europe-west1
URL Maps (🧙♀)
This is where the magic happens. Create a file url-map.yaml with this content.
Replace universal-apps-cloud-run-demo with your project id:
defaultService: https://www.googleapis.com/compute/v1/projects/universal-apps-cloud-run-demo/global/backendServices/web-service
hostRules:
  - hosts:
      - '*'
    pathMatcher: path-matcher-1
kind: compute#urlMap
name: web
pathMatchers:
  - defaultService: https://www.googleapis.com/compute/v1/projects/universal-apps-cloud-run-demo/global/backendServices/web-service
    name: path-matcher-1
    pathRules:
      - paths:
          - /api/
          - /api/*
        routeAction:
          urlRewrite:
            pathPrefixRewrite: /
        service: https://www.googleapis.com/compute/v1/projects/universal-apps-cloud-run-demo/global/backendServices/api-service
      - paths:
          - /assets/*
        routeAction:
          urlRewrite:
            pathPrefixRewrite: /
        service: https://www.googleapis.com/compute/v1/projects/universal-apps-cloud-run-demo/global/backendBuckets/assets
selfLink: https://www.googleapis.com/compute/v1/projects/universal-apps-cloud-run-demo/global/urlMaps/web
Then import the URL map on GCP:
gcloud beta compute url-maps import web --source url-map.yaml --globalWe create two url rewrite rules for the load balancer, to route all requests for
/api to the api service and all requests to /assets to the storage bucket.
SSL certs
gcloud beta compute ssl-certificates create web-ssl-cert --domains demo.zentered.ioHTTPS Proxy
gcloud beta compute target-https-proxies create web-https-proxy --ssl-certificates=web-ssl-cert --url-map=webForwarding Rules
gcloud beta compute forwarding-rules create https-web-rule --address=web --target-https-proxy=web-https-proxy --global --ports=443Enable CDN
gcloud beta compute backend-services update web-service --enable-cdn --global
gcloud beta compute backend-services update api-service --enable-cdn --global
Tada
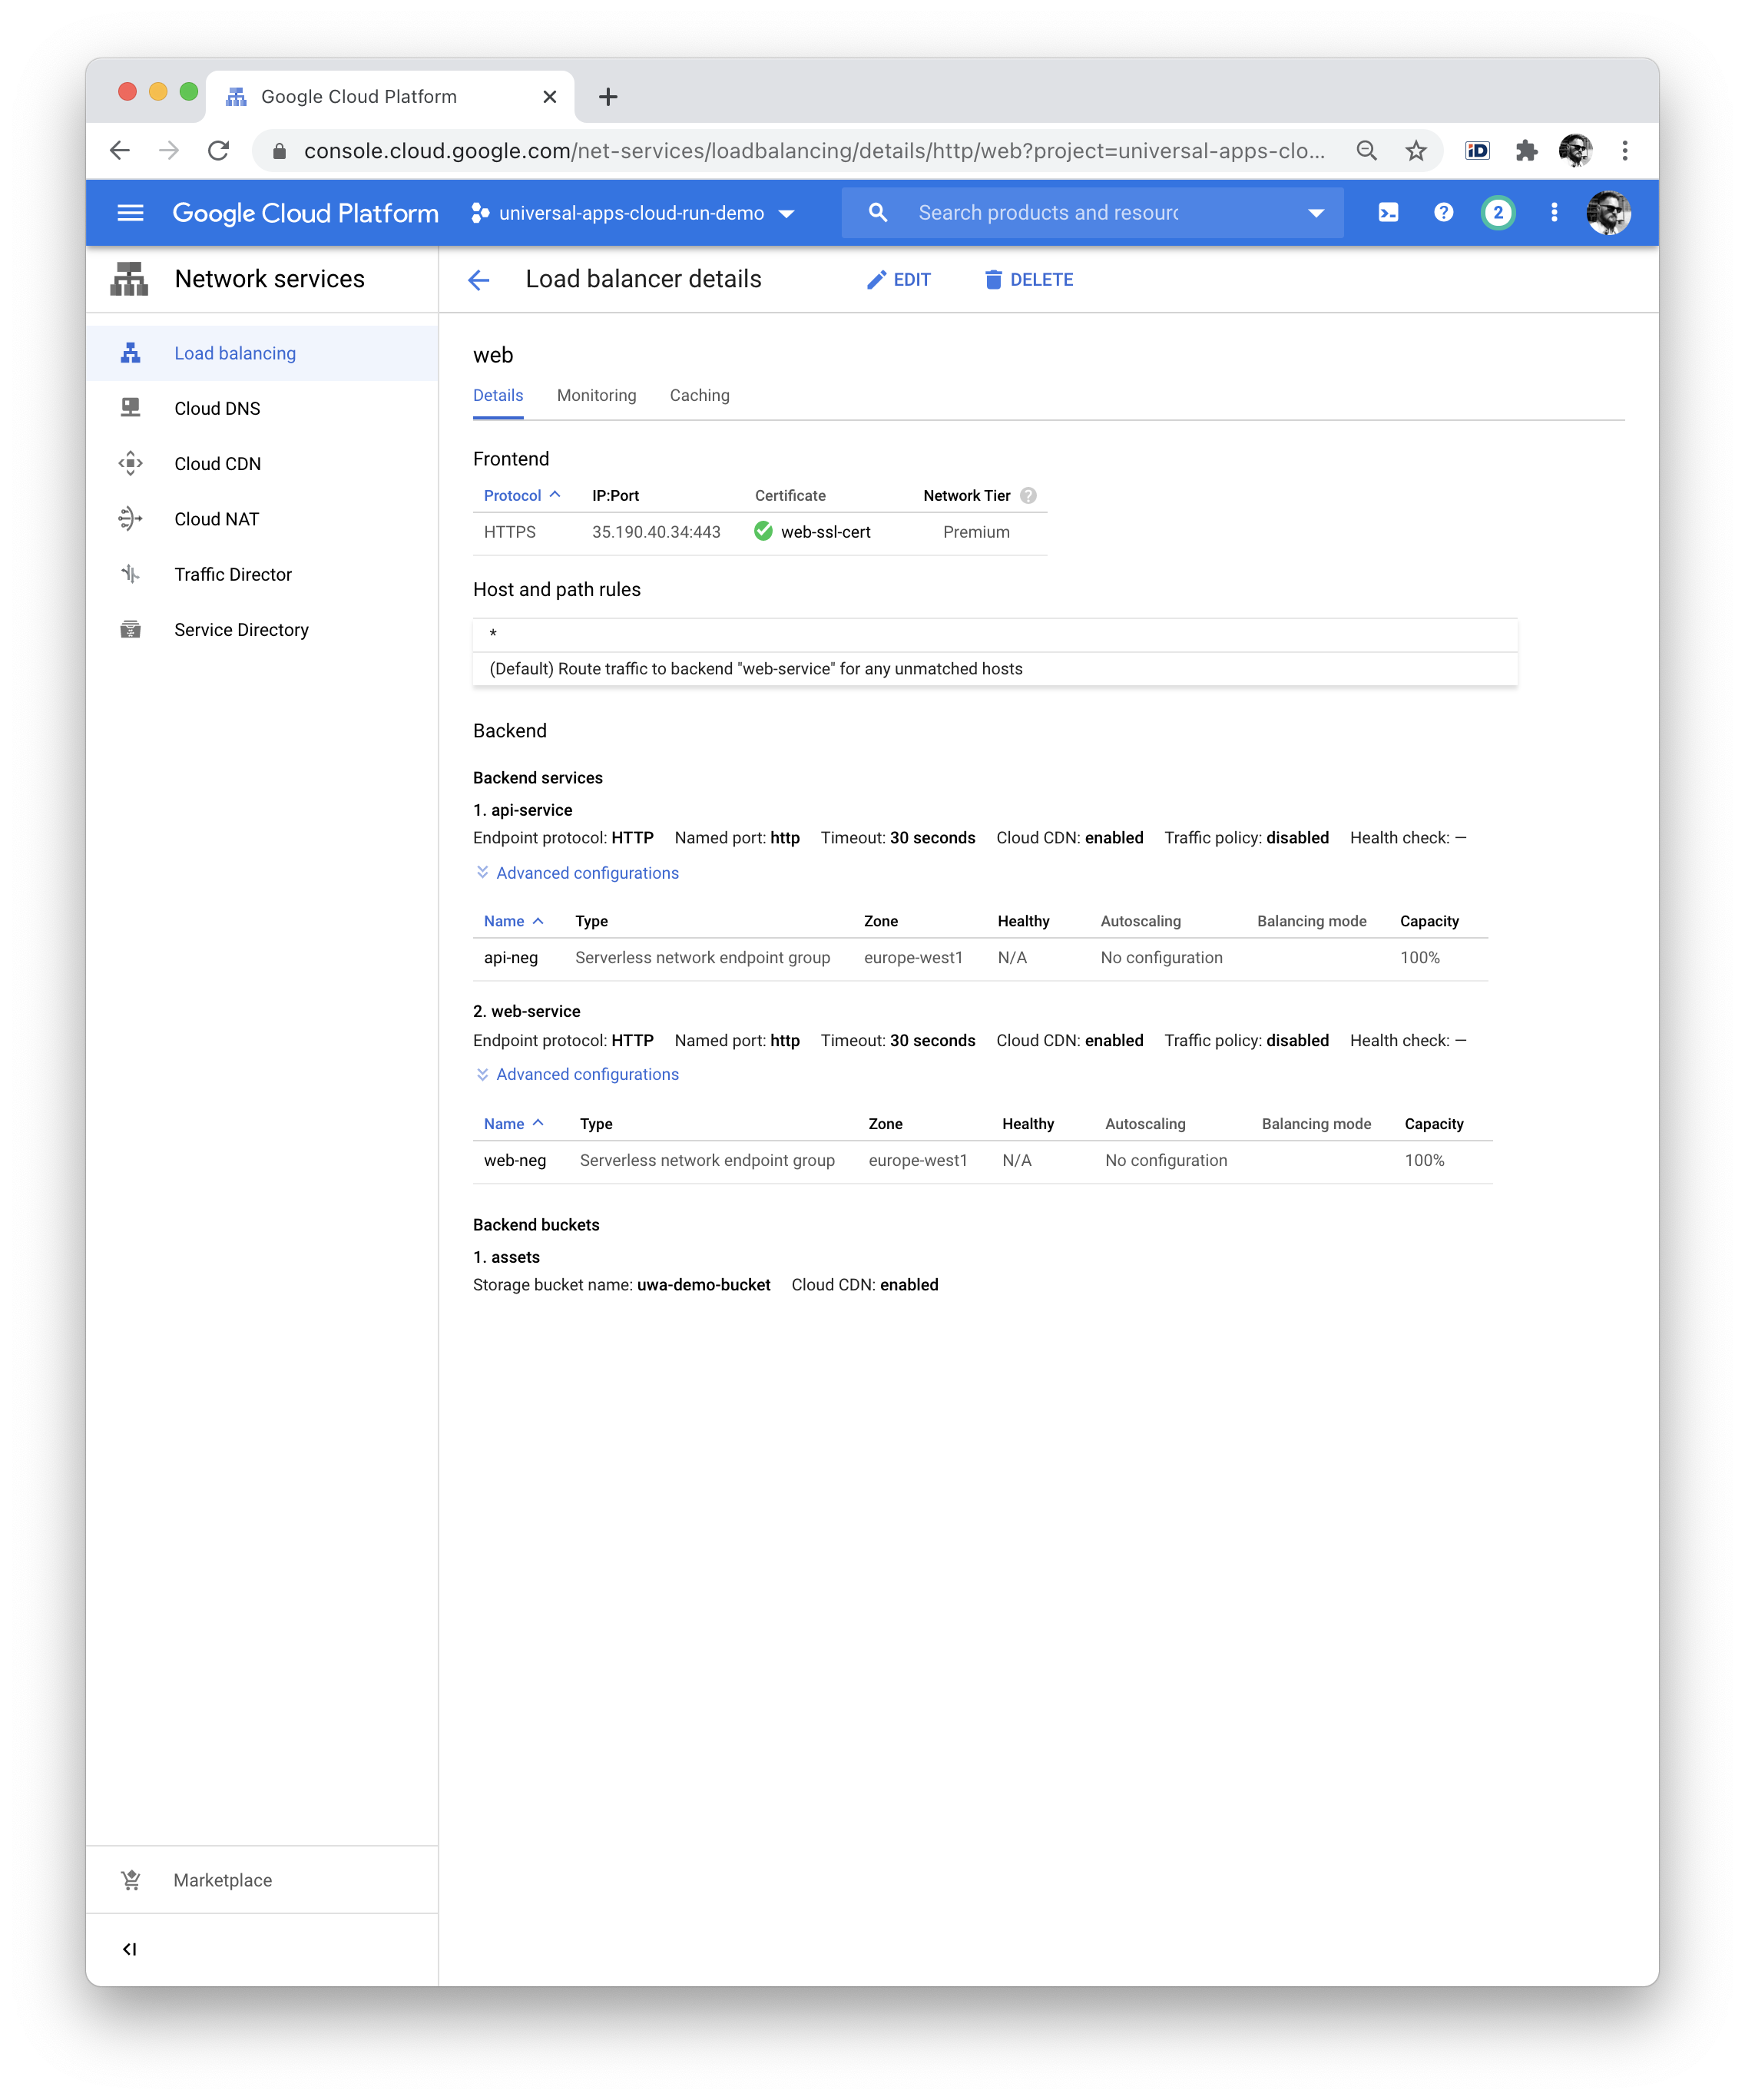
You can verify your Load Balancer config here: https://console.cloud.google.com/net-services/loadbalancing/details/http/web. It should show the two backend services, the assets bucket and the IP with SSL on the Frontend. In the Cloud CDN tab, all three backends should be listed.
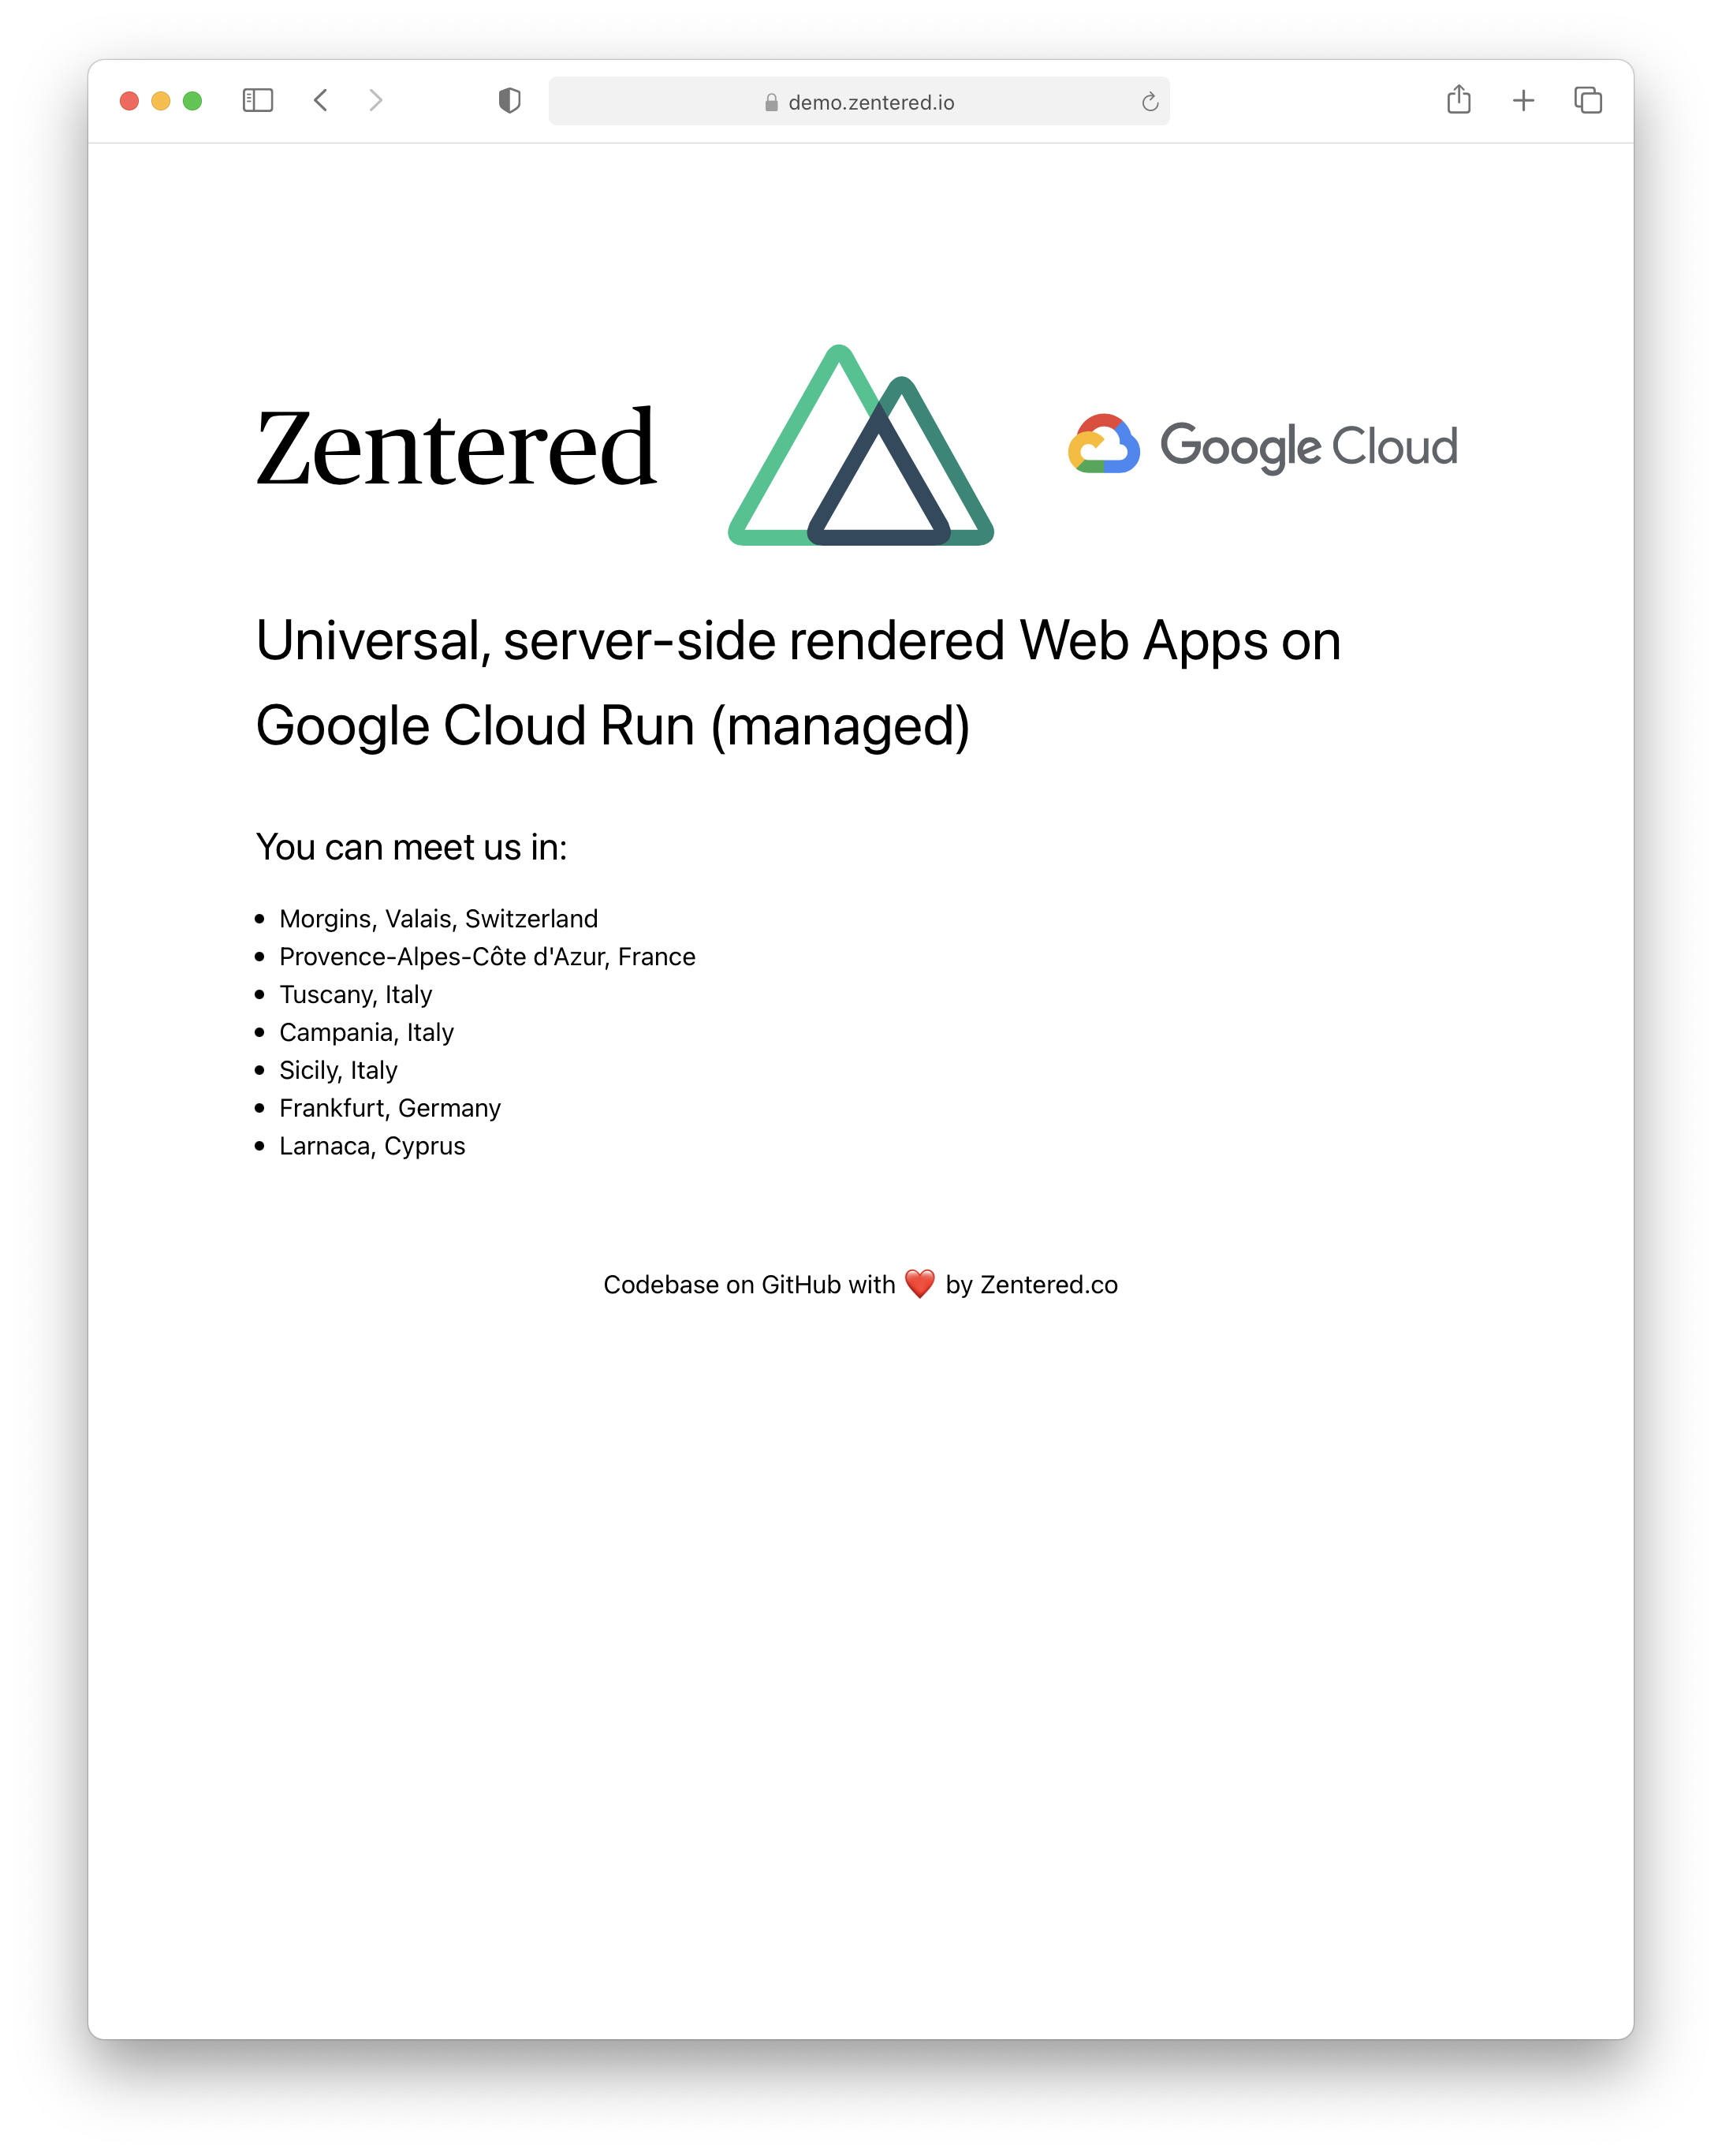
After a few minutes, your SSL certificate should be ready and your website should show. It might take a few minutes, you can check the status with:
gcloud compute ssl-certificatesGCP Cleanup
To roll back / remove all the resources created before, execute the following steps:
gcloud beta compute forwarding-rules delete https-web-rule --global
gcloud beta compute target-https-proxies delete web-https-proxy
gcloud beta compute url-maps delete web
gcloud beta compute backend-services delete web-service --global
gcloud beta compute network-endpoint-groups delete web-neg --region=europe-west1
gcloud beta compute backend-services delete api-service --global
gcloud beta compute network-endpoint-groups delete api-neg --region=europe-west1
gcloud compute addresses delete web --global
Running locally with Docker Compose
Now as everything is running in Production, we’d like to achieve a similar setup to develop efficiently on our application and API. For SSL and path rewrites (/api and /assets), we use nginx:
Head over to https://github.com/FiloSottile/mkcert and download/install
mkcert, this is required to generate SSL certificates for localhost:
cd certs
mkcert localhost 127.0.0.1
This is the entire nginx config with both upstreams (web and api), the path rewrite rules for api and assets, and the SSL configuration:
Last but not least, you’ll need Docker Compose to run all services together.
Entrypoint for the application is https://localhost:8080 which loads your
N*xt app with SSL and redirects all requests to /api/ to the api service.
- api service: port 3000
- web service: port 5000
- nginx ssl proxy: port 8080
You need to explicitly add https:// in the browser, as there’s no
http-to-https redirect yet.
We use environment variables to
overwrite Axios behaviour.
Internal requests for server-side rendering are sent to http://api:3000/api,
while client-side requests to to https://localhost:8080.
Summary
This article shows how to run universal apps on Google Cloud Run (fully managed)
with very little operations overhead. There’s no need to SSH into machines or
take care about regular system updates, and the system can easily scale by
changing the max-instances setting in the configuration or by deploying the
same services in new regions.
You can clone/download all parts of this tutorial from our GitHub Repo. Please open an issue if you find anything that is not working in this tutorial or reach out to us on Bluesky.
If you have any questions or comments, please reach out on Bluesky or start a discussion on GitHub.
Further Reading
- https://cloud.google.com/load-balancing/docs/negs/setting-up-serverless-negs
- https://cloud.google.com/load-balancing/docs/url-map?hl=en_US
- https://www.smashingmagazine.com/2020/05/getting-started-axios-nuxt/
