A Common Problem
If you have an open source project on GitHub and want a separate company or project website, a common problem to solve is: where do you version control and how do you present your docs?
For our project, we wanted our GitHub repo to contain everything needed for an engineer to contribute to or use the product. We didn’t want to pollute that space with website code/content that’s not relevant to the job they’re trying to get done at that moment. We wanted the documentaiton itself—but not the website code—to live in the project repo.
We also did not want to sacrifice readability when browsing directly in the
GitHub UI (for example, by having some sort of absolute /images/... reference
that only resolves on the web server). No matter where you choose to consume our
docs, we want you to have a lovely reading experience.
Yet, at the same time, we did want to provide features on our website above and beyond what GitHub provides (e.g., snippet copy buttons and visual tabbed sections), so we wanted to add code to the website that would augment the docs Markdown in the project repo.
In summary, our goals were to provide:
- A single source of truth for documentation—docs are as important as code.
- Documentation that lives next to code so documentation is maintained as part of the code maintenance
- Docs that are searchable and have a first-class feel while browsing on GitHub AND on the website.
- Full control over the user experience around documentation on the website so we can add features above and beyond what GitHub has.
- Avoid polluting our project repo (opstrace/opstrace) with general website code.
This blog post explains what and how we accomplished this using Next.js. And, because we :heart: open source, you can also use our code to do the same thing for your project: opstrace/next-product-docs.
Build the Website by Fetching Docs from GitHub
To accomplish these goals, we looked around for inspiration. We found it on the
Next.js website (which was previously source available). The most important
insight was that they pull the docs directly from the GitHub product repo at
website build time. They outline
the structure of their docs in a manifest.json
file in their product repo and, during website build time, pull the docs from
GitHub. So we imitated this approach. After we fetch the docs files, we run them
through remark and
rehype processors to generate the content
for the pages.
Autolink Headings, External Link Handling, Slugs, and Other Little Tricks
Many static site builders such as Hugo, Jekyll, etc., deliver these features out
of the box for Markdown rendering. Thanks to unifiedjs
and the vast amount of rehype and remark plugins, we were able to easily add
those to our docs as well. The most important features for us were the ability
to click on a heading and get the anchor in the URL for sharing
direct links to paragraphs,
and processing
external links to remove
the referral (rel=noref) and open external links in a new window/tab
(target="\_blank"). We also added
remark-gfm to support
GitHub Flavored Markdown.
Content Transformations
On GitHub, you can use relative links (../../quickstart.jpg) to reference
other files or images. This works differently when the files are loaded via a
manifest. To simplify this on the website, we removed the relative paths
entirely for internal links. For images, we remove /assets from the path and
rewrite it with the pre-set ASSETS_DESTINATION. This way images are displayed
properly on GitHub, and we have more flexibility (for example with subdomains)
on the website, see the next section, Image Hosting and Optimization. All of
this is done with a custom remark plugin, which you can find here:
remark links plugin.
Image Hosting and Optimization
To achieve the same reading experience on GitHub, the web, and locally, all
binary assets needed to be in the “right” place. That is, images need to be
version controlled in the project’s GitHub repo and also available behind our
site’s CDN. We didn’t want to pull all the assets from the repo every time we
build the website, so we created a docs/assets directory for all of the images
in GitHub and then created a GitHub Action to copy assets from /docs/assets to a
public S3 bucket fronted with the CloudFlare CDN. We then created another remark
plugin to rewrite the path (for example, ./assets/image.png or
../../assets/image.png) to the subdomain, which is configured for
CloudFlare/S3.
Once we had a pipeline handling the images, and since we’re working on a public repo where everyone can modify docs and add images, we decided to run all images through image processing to have optimized images on the website. This also works great with a GitHub Action:
name: Process Images

on:
  pull_request:
    paths:
      - "docs/assets/**"

jobs:
  compress:
    runs-on: ubuntu-latest
    steps:
      - uses: actions/checkout@v2
        with:
          ref: ${{ github.event.pull_request.head.sha }}
      - name: Tinify Image Action
        uses: namoscato/[email protected]
        with:
          api_key: ${{ secrets.TINIFY_API_KEY }}
          github_token: ${{ secrets.GITHUB_TOKEN }}
          commit_user_name: "TinifyBot"
          commit_message: "chore: compress image(s)"

name: Upload Assets
on:
  push:
    branches:
      - "main"
    paths:
      - "docs/assets/**"

jobs:
  upload:
    runs-on: ubuntu-latest
    steps:
      - uses: actions/checkout@v2
      - name: Upload to S3
        uses: shallwefootball/[email protected]
        id: S3
        with:
          aws_key_id: ${{ secrets.AWS_ASSETS_KEY_ID }}
          aws_secret_access_key: ${{ secrets.AWS_ASSETS_SECRET_ACCESS_KEY}}
          aws_bucket: ${{ secrets.AWS_ASSETS_BUCKET }}
          source_dir: "docs/assets"
          destination_dir: ""
Navigation
We developed three visual components for navigation:
- Sidebar / Navigation
- Table of Contents
- Content
You can find example components in our getting-started repo for the Table of Contents and the Sidebar.
(Aside: in the time since we built this, GitHub released its auto-TOC feature.)
To generate a static site, on a Next.js page you can define “props” (content for the individual page) and “paths” (which slugs/paths are available and need to be rendered with this page). So we also export both props and paths from the documentation library to simply copy & paste into a page.
All content that is rendered is serialized and processed beforehand with remark and rehype. This includes simple plugins like Autolink Headings. Synatax Highlighting is done via prism-react-renderer in the CodeBlock component. There’s a huge list of additional plugins that can be used with the component we built.
Search
Search is provided for GitHub repos, but it’s not possible to scope the search to a specific folder (docs). Search for any content is crucial, so we decided to build this into our Opstrace website. We chose the popular Algolia Search and implemented their search box straight into the Sidebar component. To populate the search index, we created a GitHub Action to sync content automatically, whenever something in the documentation is changed. The Action fetches the manifest and markdown files and uploads them to Algolia for indexing.
name: Sync Algolia

on:
  push:
    branches:
      - 'main'
    paths:
      - 'docs/**'

jobs:
  algolia:
    runs-on: ubuntu-latest
    name: Algolia Sync
    steps:
      - uses: actions/checkout@v2

      - uses: opstrace/[email protected]
        with:
          algoliaId: 'QTVPN6XDU8'
          algoliaKey: ${{ secrets.ALGOLIA_KEY }}
          algoliaIndex: 'opstrace-docs'
  vercel:
    runs-on: ubuntu-latest
    name: Rebuild
    steps:
      - name: Trigger rebuild
        run:
          curl -X POST https://api.vercel.com/v1/integrations/deploy/${{
          secrets.VERCEL_DEPLOY_ID }}
New Features
Reading Time

Displaying the “Reading Time” is a great way to manage the expectations of readers before going through an entire article. We’re in the process of adding this feature to our docs, to show the estimated reading time directly in the sidebar for each article, as well as providing it at the top of the page.
Snippet Copy & Paste
This is a standard feature these days on most sites (except GitHub), to have a button in the technical documentation to copy one-liners or larger snippets and make it easy to paste into the terminal. We use react copy to clipboard in a custom remark plugin using react-copy-to-clipboard.
Variable Injection / Code Substitution
This is the highlight of the documentation library for a great user/developer experience. Opstrace uses a lot of terminal commands to set up the product. In these commands, for example, the instance name is required. In a traditional documentation, you would need to either copy and paste into a text editor, change the variable, and then copy & paste again into the terminal; or fiddle around in the terminal input to get to the right place and modify the name. We wanted a user to specify the variable only once and to have our documentation update so that all code snippets use the value of the variable. This eliminates multiple manual steps the user would otherwise have to do themselves.
For example:
Turns into this:
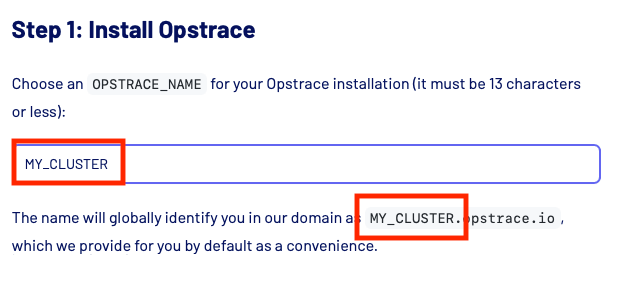
This was a little tricky since all pages are statically rendered for best SEO performance. We created a custom remark plugin to render a JSX component into the page. By passing the state, we were able to modify the variable with a simple onChange event from the component. You can find the source code for this here: remark state plugin
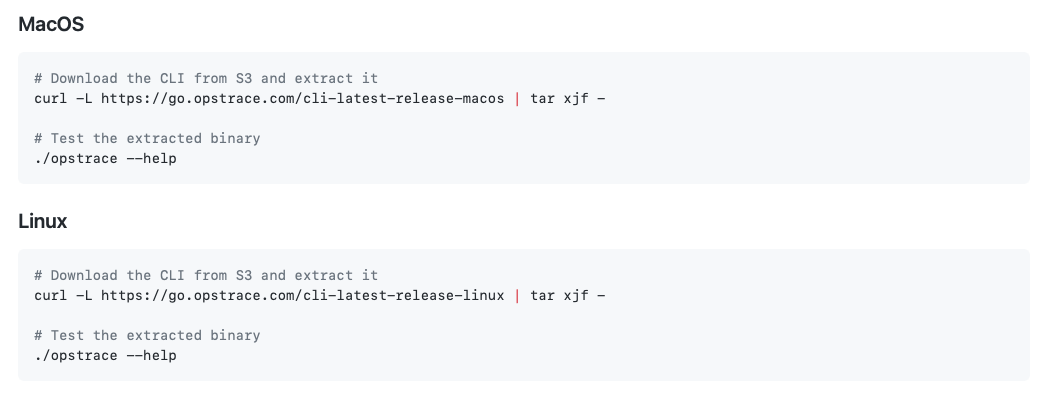
Tabs
To give as many examples as possible in various programming languages and systems, we decided to go with Tabs. Visitors can pick their preferred language or system and easily copy the snippets they need.
This isn’t exactly in the Markdown spec, so we came up with a creative solution and wrote a component that transforms the following example from our Quickstart:
    <!--tabs-->

    ### MacOS

    ```bash
    # Download the CLI from S3 and extract it
    curl -L https://go.opstrace.com/cli-latest-release-macos | tar xjf -

    # Test the extracted binary
    ./opstrace --help
    ````

    ### Linux

    ```bash
    # Download the CLI from S3 and extract it
    curl -L https://go.opstrace.com/cli-latest-release-linux | tar xjf -

    # Test the extracted binary
    ./opstrace --help
    ```

    <!-- /tabs -->
Into a beautiful tab layout:
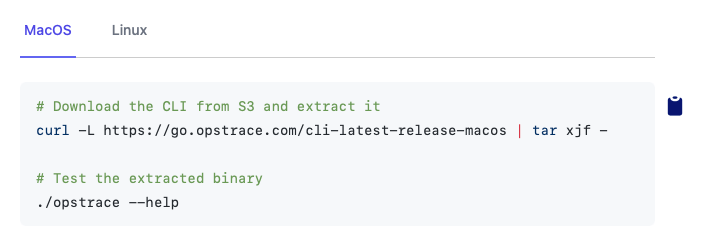
The most important fact to mention is that this is still 100% valid Markdown and can be consumed on GitHub just as easy as on our own website:
It’s all Open Source!
We think this is a great step forward toward better product documentation across multiple platforms and audiences, and we’re really excited to share these components with you under the Apache License, Version 2.0:
Product Docs Component for Next.js
github.com/opstrace/next-product-docs
contains the render function, paths, and props to build static documentation
pages from your repo. Check out the
README for detailed
instructions and feel free to
open an issue or
contribute.
Product Docs Example (Quckstart) Repo
You can fork, clone, or download our
quickstart repo which
includes the [[...slug.jsx]] file that is used to generate static
documentation pages by using the component. There’s also a Sidebar and ToC
component you can copy into your own project and modify according to your design
needs.
Algolia Docs Sync
Check out Algolia InstantSearch to add a search box to your site. You can use the GitHub Action Algolia Docs Sync to regularly update your search index from your documentation.
Image Processing & Upload to S3
process-images and upload-assets are the two workflows we use to run images through an image optimization API and then upload to a storage bucket, which is configured as a subdomain.
Future Work
As we aim to continue building on our forward momentum, many enhanced features will follow:
- Preview documentation changes on each Pull Request for improved local development
- Support local previews and caching of pages and images for faster builds
- Improved search results page
- Add versioning support to show documentation specific to each release
- We welcome feature requests
If you have any questions or comments, please reach out on Bluesky or start a discussion on GitHub.
